Pages

.

Dutch Crunch Bread and Bean Sandwich for Daring Baker's Challenge March 2012

This month for Daring Baker's Challenge Sara and Erica from Baking JDs challenged us to make Dutch Crunch Bread.  Dutch crunch bread is not any particular type of bread, it's a topping which can be used for any type of bread. In Dutch it's called 'Tigerbrood' or 'Tiger Bread'  since it gets a tiger like shell on top of the bread after baking.  The end product is a sweet crunchy topping which is ideal for sandwiches.

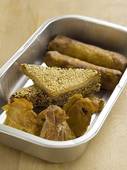
After so many obstacles I have to bake and post this recipe.  First time, the yeast didn't work well which was my fault and the second time the yeast worked well and everything looked perfect, I happily left the bread in the oven and it didn't cook.  I was looking for a long time and it remained the same, oops! power cut.  At least if the power cut was for our whole area, I would have blamed the country's system easily but it was only in our house. It took me nearly 1 hour to figure out that the power cut was only in my house, then I have to call for an electrician and it took more than 2 hours to get everything right.  My poor bread was waiting silently in my oven in half cooked stage which spoiled the texture and topping a bit, it didn't turn out to my expectation, still it was good.  Also I was not in a mood to try it again immediately, so went ahead in posting the recipe. I used this bread for bean burger or bean sandwich, which is our favourite vegetarian option.  Thank you Sara and Erica for sharing this amazing bread with us, this is definitely a keeper.

Dutch Crunch Bread or Tigerbrood


Preparation Time: 10minutes+ rising time
Cooking Time: 30- 40 minutes
Makes 5 rolls 

Ingredients:
Soft White Rolls:
Plain flour- 500 g
Fast action dried yeast- 3/4 tbsp
Sugar- 3 tsp
Salt- 1 tsp
Oil- 1 tbsp
Warm milk- 240 ml

Dutch Crunch Topping:
Rice flour- 240 g
Yeast- 1 tbsp
Sugar- 1 tbsp
Salt- 1/2 tsp
Oil- 1 tbsp
Warm water- 240 ml

Method:
Prepare the dough:
Mix the flour,sugar, salt and yeast in a large bowl.  Make a well in the center, add the warm milk slowly and beat with a electric mixer fitted with the dough hook.  Once the dough  comes together, stop beating with electric mixer.  Knead the dough for 10minutes using your hand.  Place the dough in a clean and oiled bowl.
  Cover with a cling film and keep it in a warm place for about 1 hour or until doubled in bulk.
Once the dough has risen, knock the air back.  Divide the dough into 5 equal rounds and place it in a baking sheet.  Cover it loosely and let it rest for 30 minutes.
Meanwhile preheat the oven to 200 degree Celsius.  Apply a thick layer of Dutch crunch topping on top of each rolls.  Bake it in the preheated oven for 30 to 40 minutes or it looks lightly brown on top.

To make the Dutch crunch topping:
Mix all the ingredients together in a bowl and let it rest for about 15 minutes.  Then use it in the recipe as suggested.

Note:
The oven temperature and cooking time might vary according to different oven.


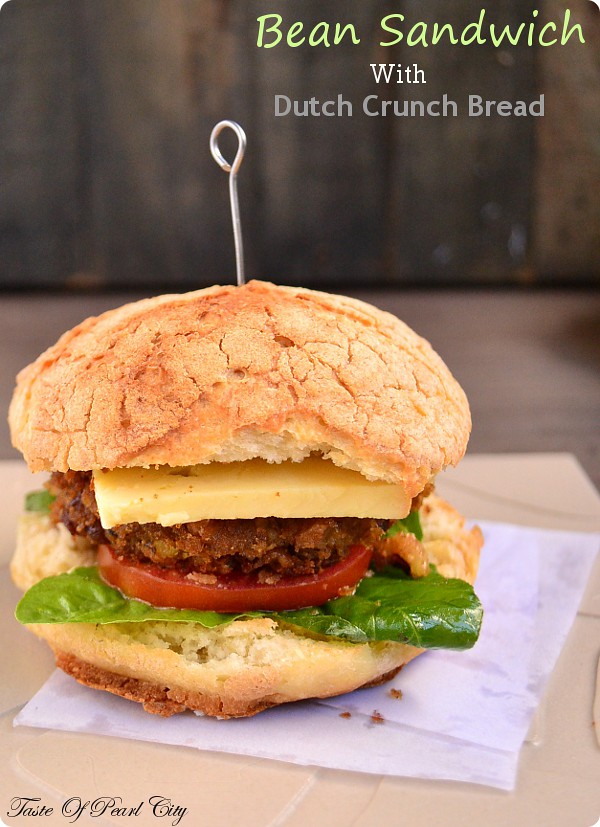
Mixed Bean Sandwich:


Bean Patties:


Preparation Time: 20 minutes
Cooking Time: 20 minutes
Makes 6 to 7 patties


Ingredients:
Mix of kidney beans,black eye beans, broad beans- 100 g
Onion- 1 finely chopped
Capsicum- 1/2 finely chopped
Curry powder- 2 tsp
Chilly powder-1/2 tsp
Flour- 1 tbsp
Bread crumbs-2 tbsp
Salt and pepper to taste
Oil for frying

Method:
Soak the dried beans in water for overnight.  Pressure cook the beans up to 4 to 5 whistles.  Completely mash the beans with a masher, add the chopped onions, capsicum, flour, chilly powder, curry powder, salt and pepper, mix it well.  If the mixture looks too crumbly, sprinkle some water to make it like a dough.  Take small sized balls, roll it and pat it like patties.  Dip the patties in the breadcrumbs completely.
Heat oil in a pan, when the oil is heat enough, drop the patties one by one and fry it till it looks golden brown on both sides.

Bean Sandwich:


Preparation Time:5 minutes
Cooking Time: 3 minutes
Makes 2 sandwich

Ingredients:
Dutch Crunch Bread- 2 rolls
Bean Patties- 2
Tomato- 2 slices
Blanched Spinach- 4 to 5 leaves
Cheese- 2 slices
Mayonnaise- 1 tbsp

Method:
Slice the bread into half.  Apply the mayonnaise at the bottom.  Place 2 to 3 spinach leaves, then a tomato slice, top it with a bean patties and a cheese slice.  Place it under a grill for about a minute until the cheese starts melting. Serve it immediately.


reade more... Résuméabuiyad

Any One Can Cook: Series 45

Dear Foodies,

Hope you all had a great weekend. Thank you everyone for linking your recipes with Any One Can Cook. Looking forward to same support from you as always.  Let's see the three selected recipes from last week series.
Sugar Coated Green peas by My Kitchen Flavours- Bon Appetit
Asian Inspired Pineapple Cucumber Salad by Easyfoodsmith

Middle Eastern Salad by Rathai's Recipes

If you are a new reader to this blog, read more about this event here and here.  As usual link your recipes related to the event in the linky too below.  If you find any trouble in linking your recipes, please email me your recipe link to ayeesha.riaz@googlemail.com

reade more... Résuméabuiyad

Spaghetti Salad with Tofu, Chickpeas and Lemony Coriander dressing

The title of the recipe might look quite long but that explains everything there in the recipe.  This is a very simple recipe which can be made under 10 minutes and it's nutritious too.  As we know that tofu and chickpeas are very good source of protein, this is a good alternative for vegetarians.  In a way, it's better than meat.
   Regular intake of tofu lowers your bad cholesterol, it's also rich in calcium, so this would be a better choice for those who suffer from lactose allergy. There are numerous way to use this tofu, in soup,salad, smoothies, cakes, sandwich, gravies etc.... You can search online for tofu recipes and use it the way you desire.

Coming to chickpeas, which is again a rich source of protein, lowers your blood sugar level too.  This is also rich in dietary fibre, which helps to control your weight gain. This is also a good source of folic acid and iron.  If you would like to read more about tofu and chickpeas click here and here.


Preparation Time: 10 minutes
Cooking Time: 10 minutes
Serves 2

Ingredients:
Spaghetti- 300 g
Tofu- 100 g ( diced into cubes)
Boiled chickpeas- 100 g
Coriander leaves- 6 stalks ( washed and chopped )
Garlic- 3 pods
Lemon- juice of 1 whole lemon
Olive oil- 2 tbsp
Honey- 1/4 tsp
Salt to taste

Method:

Cook the spaghetti,rinse it off in cold water and keep it separately.  Grind together coriander leaves,garlic, lemon juice, honey, olive oil and salt.  Mix together the spaghetti, tofu and chickpeas in a large bowl.  Add the sauce and toss it up well until the spaghetti, tofu and chickpeas gets coated in the sauce. At the end if you wish you can add some freshly ground black pepper, I prefer to leave it as it is. This can be served as a meal by itself along with some extra salad if required.  You can pack it for lunch.  The good thing is, it taste good even when it's cold and you can make this well ahead of time and relax yourselves.

Note:
Along with coriander leaves, you can also mint or any other herbs of your choice.  If you are not a big fan of tofu and you don't want to use them as cubes,  crumble the tofu and use it in the recipe which taste even more better.

Linking this recipe with Summer spirit, Love Lock series- Legumes started by Vidhya, Beat the Heat, Say Cheese, Bon Vivant- Savoury, Dish it Out, Cooking Concepts- Vegan Diet, Healthy Morsels- Pregnancy, Summer Splash event started by Kalyani


reade more... Résuméabuiyad

Thoughts to munch on - Healthy Morsels

Dear Foodies,

This is a quick and short post to thank you all for the support which you give for our group event Healthy Morsels. We are really happy and excited to see all the entries flowing in this short period, so thank you again.  We would also like to take this opportunity to inform you about our humble group which we have created in Facebook.  Earlier in our announcement post,we have given a small note about our Facebook page, Healthy Morsels- Food Blogger's Event.  This page has now been transformed into a group with the same name as Healthy Morsels- Food Blogger's Event.

 
The core theme of this group is to have many interactive sessions among both bloggers and non bloggers. The discussions would be related to the current theme of the event.  We would like to invite you all to Healthy Morsels group, join in our discussions and share the knowledge with us. Please visit our group by clicking the link here and let's start our healthy interactions from here... Feel free to also invite your elderly family members and friends to our group, so that they can also benefit by participating in the discussions and sharing their thoughts and wisdom.

A kind request: Bloggers please do not post any recipes in the Facebook group. You can continue to link your entries for the event, as always, in the Linky given in our blogs. Non-bloggers are welcome to post their recipes related to the theme in the Facebook group page.

Looking forward to your continued support and encouragement....

Yours,
Healthy Morsels Team

reade more... Résuméabuiyad

Karuppu Uzunda Vadai/ Black Urad Dhal fritters

If you are a regular read to my blog, you should have read this post about Uzunda Vadai already in my blog. It's a typical South Indian snack made with urad dhal. This is exact the same version of vadai, made with same lentils.  So, now this is the question,what's the difference between these two vadas?  The only difference is,  in this vadai I have used the lentils along with the husk/ skin.  Black Urad dhal by it self is considered to be healthy,when it's used along with the husk/skin  it's considered to be much more healthier.


I couldn't find any particular source or link to show the health benefit of these pulses but I have heard lots of  benefits through our grandmas and great grandmas . Not just my grandma, from many others too.  So when there is more than one source of information makes the same point,  the information might be right to some extent. Do you agree?

Here are few benefits of these lentils to my knowledge.  Apart from being a great source of energy, these lentils when used along with the husk known to reduce the risk of diabetes. It strengthens the bones, it prevents the thinning of bones due to ageing.  Mostly our grandmas mention that this strengthens the hip part for women,which means it avoids backache in women.  Regular consumption of these lentils strengthens your backbones.  Generally the best way to have these lentils is as a porridge,  but today I have used these for vadai's.  It may not look very appetizing,  but the flavours are right there,of course along with all the goodness.

Preparation Time: 15 minutes+ soaking and grinding time
Cooking Time: 20 minutes
Makes about 20 vadai's

Ingredients:
Black urad dhal with skin- 150 gm (soaked in water for minimum of 8 hours or overnight )
Rice- 1 tbsp ( soaked in water for 2 hours )
Ginger- 1/4 inch ( finely chopped )
Black pepper corns- 8 to 10
Small onion- 3 finely chopped
Curry leaves- 5 to 6 leaves roughly chopped
Salt to taste
Oil for deep frying

Method:
Grind the soaked lentils and rice in a grinder by adding very little water.  Once it looks like a semi coarse paste, remove it from the grinder.  Add salt and beat well.  The batter should not be too watery or too fine.  It should resemble a thick batter and lightly coarse paste.  After two hours, mix the pepper,onion, ginger and curry leaves to the batter and beat well again.  If you are not using immediately, keep it in the refrigerator and take it out 1/2 an hour before using it.
To make the vadai:
Heat the oil for deep frying in a heavy bottom kadai.  Wet your palms in water,  take a small amount of batter, roll it out like a ball and place it in your palm. Dip your finger in water and make a small hole in the middle.  Gently drop it in the hot oil.  You'll notice oil bubbling around the edges of the vadai. ( Keep the flame in medium to low if the oil is too hot.  If the oil is too hot, it might quickly become brown in the outside and remains uncooked in the inside). After a minute turn the vada to the other side.  Once the bubbling of oil slows down or stop, take it out.  Serve immediately with Coconut chutney.

Note:
Incase if you are having heartburns during pregnancy, avoid this.  Instead you can have it after delivery, since it strenghtens the back bones.

Linking this post with Indian Food Palooza, Only South Indian, Evening Snacks Recipes, Healthy Morsels- Pregnancy, I'm the star, Bon Vivant- Savoury Items, Hot and Spicy Treat- Festive FoodComfort Food.

reade more... Résuméabuiyad

Any One Can Cook: Series 44

Hello Foodies,

Hope you all  had a great weekend.  It's the same story here, same event and same rules  but I'm sure there will be much more exciting from your side.  Though the event and rules are always the same, it's the recipes which makes the event exciting and keeps it going. So keep linking your recipes and make the event more and more exciting. Last week the entries were really good and was hard to choose just 3.  Anyway sticking to the rules, here are the 3 selected recipes from last week series:
Paneer Mawa Circles from Dee's Kitchen

Andi Urunda from Faji's Hot Pot

Bean Sprout Salad from Kitchen Boffin
If you are a new reader to this blog, read more about this event here and here.  As usual link your recipes related to the event in the linky too below.  If you find any trouble in linking your recipes, please email me your recipe link @ ayeesha.riaz@googlemail.com

reade more... Résuméabuiyad

Jil Jil Jigarthanda

Jil Jil Jigarthanda is a cool drink,known to be originated from Madurai, Tamil Nadu state of India.  Although this is a popular drink in Madurai,  this can be found allover Tamil Nadu. I have also come across different flavours in different places.  Some have a malai taste along with jelly and ice cream.  The common one must be with rose flavour,badam pisin  and ice cream.


Badam pisin is a type of edible gum which looks like a little stone or rock.  This is known to be a natural coolant for our body.  This is consumed a lot during summer here in India.  Badam pisin, the jelly like substace is generally used along with Nannari sherbet,jigarthanda or any other cool drink.

Ingredients:
Milk-1/2 litre
Sugar- 3 tbsp
Rose syrup- 3 to 4 drops
Badam pisin- 3 to 4 pieces
Ice cream- 4 scoops( vanilla or kulfi flavours)

Method:

Soak the badam pisin in a glass of water for overnight.  Badam pisin absorbs all the water and it looks like a jelly .  |Add some  more water to it and leave it in the refrigerator until you use it.
Now boil the milk along with 1/4 litre water, continue boiling it until reduces to half.  Take off from heat.  Let it cool down completely.  Add rose syrup and sugar,mix it well until the sugar dissolves completely. Refrigerate for minimum of 4 to 5 hours before serving.  Just before serving, take a tall glass, add a spoonful of badampisin in the bottom, pour the rosemilk,stir well and top it up with the ice cream.

Note:
Increase or decrease the amount of sugar according to your taste.  Please don't add the badam pisin along with the milk and store it in the refrigerator, badam pisin will absorb all the liquid.
reade more... Résuméabuiyad

Any One Can Cook: Series 43

Hello Foodies,

Before I start the post, my apologies and apologie again, I know I probably said this a million times in this event.  Something or another leads to cancel this event.  This time it was due to some technical issues with the linky tools, I had to cancel the event unfortunately.  Although the problem was sorted out a week ago,it took me a few more days to catch up with the event.  Anyways I'm back with event again, hope you are all ready  to link your recipes in the event.  Common ladies if you haven't participated in this event so far, this is your time,rush your entries to the event.  There are only few more months left for the voting to begin.  If you are not familiar with what I'm talking about and want to know more about the event details,click here and here.
Following are the selected recipes from the last series.
Chocolate Covered Dates

Celeraic and Green Apple salad

Vegetable stuffed Spongy Omlette
 If you would like to get featured in this event,win prizes and awards, please link your recipes in the link given below. In case if you find any trouble in linking your recipe, please email me your recipe link to ayeesha.riaz@googlemail.com.
reade more... Résuméabuiyad

Gujias With Paneer and Coconut filling

It's been so colourful this week everywhere, not just in India and in our great blogosphere too.  Oh! Yeah, everybody around here is celebrating Holi,  I don't know much about this festival and we don't celebrate it either, but I don't think there is nothing wrong in getting tempted by the sweets which are specially made for Holi. Although being a food blogger is a real pleasure, sometimes I feel like we do have a few disadvantages, like started craving and tempted by the foods which we see in other blogs  or may be it's just me :( 


Anyway, this whole week I have been tempted by these yummy sweets and drinks like gujias and thandai.  I satisfied my craving for thandai by having some store bought Badam milk, so I need some gujias now.   Gujias are a traditional Indian sweet, it has a wrapper made out of flour and filled with khoya , dry fruits and coconut.  We, in South India, particularly in places like Nagercoil, they make a sweet very similar to this, filled with only sweetened coconuts, which is known as Poorians, funny name, huh!
Me and my husband enjoy this sweet with just coconut filling, today I have added some paneer too, which was really yummy! Enjoy making this simple sweet with your favourite filling.

Preparation Time:30 minutes
Cooking Time: 30 minutes
Makes about 20

Ingredients:
For the pastry cover:
Plain flour- 200 g
Ghee- 1 tbsp ( melted )
Salt- 1/2 tsp
Bicarbonate of soda- a pinch
Water to knead the dough

For the filling:
Paneer- 100 g
Fresh grated coconut- 4 tbsp
Sugar- 50 g
Saffron- few strands soaked in warm milk
Cardamom powder- 1/2 tsp
Almonds and pistachios- 1 tbsp (roughly chopped)

For the paste:( mix it together to make as a paste )
Plain flour- 1 tbsp
Water- 1/2 tbsp

Oil for deep frying.

Method:
Mix the flour, salt and bicarbonate of soda in bowl.  Add the melted ghee and mix well to incorporate into the dough. Now add enough water and make it into a smooth and pliable dough.  Cover the dough and let it rest for 15 minutes.

Prepare the filling:

Crumble the paneer and mix it with sugar, coconut and saffron milk.  Start heating this mixture in a stove top in medium heat, keep stirring continuously without sticking to the bottom of the pan.  After sometime you can notice that the mixture has started releasing some liquid.  Keep stirring continuously until the mixture looks dry.  Finally add the cardamom powder and chopped nuts, mix it well.

Prepare the gujias:

Divide the dough into 15 to 20 equal rounds.  Roll out each into a 5 to 6 cm diameter circle.  Place a small amount of filling in the middle.  Apply the paste around the edges, make it into a semi circle and seal the edges.


Heat oil in a kadai, when the oil gets heated.  Reduce the temperature to medium to low, add 2 to 3 gujias at a time and fry it on both sides until it looks golden brown in colour.
Serve it while they are still warm or let it cool down completely and store it in an air tight container.  Since we have added paneer and coconut, it's better to finish it off in a day or two.
 
reade more... Résuméabuiyad

Black eye peas gravy

I might have over 400 recipes in my blog, but still I have the question of what to cook today almost everyday. There might be a millions of recipes passing through our mind from television shows, Internet or book,  the questions is about ,do I have these ingredients in my pantry,will this recipe suit my family and above all is it easy to cook and how much time does it take.  It's not possible to spend hours and hours in the kitchen everyday.  On special occasions we might cook different recipes and lots of varieties to please our family, but on daily basis, I'm sure everybody will be looking for something easy to cook and less time consuming.


This is one such gravy or curry which can be cooked  in minutes.  Also if you prepare the base of the curry and store it in a refrigerator, you can use different beans,potatoes or mixed vegetables or even chicken or meat  with the same base.  Imagine you have the base of the gravy stored in the refrigerator, you wake up late in the morning and got 15 minutes to prepare your lunch box.  Take out this curry base, heat it up for 5 minutes, then add canned beans or cooked beans to the gravy,let it simmer for another 5 minutes.  Your quick curry is ready under 10 minutes,  now you have 5 more minutes to spare for other work.  That sounds good isn't ?

Coming to the recipe, as I already said different pulses,mixed vegetables or potatoes can be added to this gravy.  I prefer adding pulses and today's pulse is Black eye peas. Black eye peas are high in fibre. Since you get the best from the dried ones, I would prefer using the dried one rather than the canned ones.  It's also rich in potassium and iron.  These pulses are also a rich source of protein.  Particularly if you are following a vegetarian diet, it's good to include these pulses in the regular diet to keep up the protein level. Read more about black eye peas from here.  Let's see how to make this simple and easy gravy.

Preparation Time: 10 minutes
Cooking Time: 30 minutes
Serves 2

Ingredients:
Dried black eye peas- 100 g
Onion- 1 large (roughly blended)
Tomato- 1 medium sized ( pureed)
Ginger garlic paste- 1 tsp
Chilly powder-1/2 tsp
Coriander powder- 1 tsp
Curry powder or Channa masala powder-1 tsp
Garam masala- 1/4 tsp
Cinnamon- 1/4 inch stick
Cumin seeds-1/2 tsp
Coriander leaves- 1 tbsp ( finely chopped )
Lemon juice- juice of 1/2 a lemon
Oil- 1 tbsp
Salt to taste

Method:
Soak the dried black eye peas overnight or minimum 3-4 hours.  Pressure cook the soaked peas for upto 1 whistle.  Coarsely blend the onions in a blender and keep it separately.  Heat oil in a heavy bottomed pan,  add cumin and cinnamon.  Add ginger garlic paste and coarsely ground  onions and saute well.  Once the raw smell goes and slightly brown in colour , add the pureed tomato.  Mix well and stir until you see oil on the sides. At this stage add all the spice powders and mix well.  Cover the pan and cook until oil floats on top.
If you would like to store in a refrigerator,  at this stage take it off from heat,  add the lemon juice, allow it to cool down completely and store it in a glass jar.  This can be kept upto a week in the refrigerator.
To continue with the recipe,  add the cooked peas,stir well.  Cover the pan and let it simmer for 10 minutes. Add salt to taste, chopped coriander and finally lemon juice.  Stir well and take it off from heat.  Serve it warm with breads, roti's or rice.
reade more... Résuméabuiyad