Pages

.

Coconut and Lemon Loaf for Daring Baker's February 2012

Daring Baker's was hosted by Lis for February 2012.  Lis challenged us to make quick breads,which I  have to quickly whip up in the last minute as always.  Lis has provided us with different sources to refer for quick breads with different flavours and versions.


Quick breads are made with quickly without kneading,rising and yeast.  Basically quick breads are made with rising agents like baking powder,bicarbonate of soda along with moist texture.  A quick bread can be either sweet or savoury,  you can play with different flavours to make your own version of quick bread.  A quick bread can be in the form of loaves,muffins or popovers.

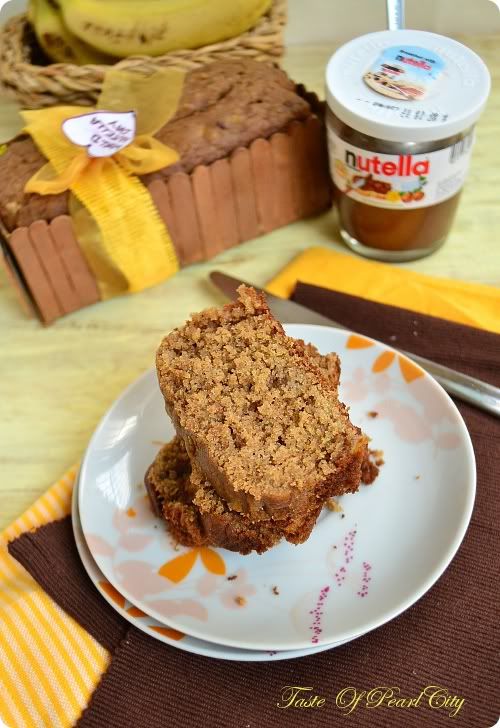
I have choosed Coconut and lemon loaf for this challenge.   Coconut by itself is a fantastic flavours,  I know it goes well with cardamom.  I love the flavour of lemon and vanilla in any cakes, so today I wanted to try lemon and vanilla along with fresh grated coconut.  I felt the flavour of coconut in every bite, this is a super moist and yummy bread.  Since I made it in the last minute, I couldn't come out with some appealing pictures for this yummy loaf.  If you are a coconut lover, I'm sure you'll enjoy this a lot and will become your favourite once you try it.

Preparation Time: 10 minutes
Cooking Time: 20-25 minutes
Makes 1 mini loaf

Ingredients:
Plain flour- 100 g
Fresh grated coconut- 75 g
Butter- 75 g ( at room temperature )
Sugar- 75 g
Egg- 1
Lemon juice- Juice of 1/2 a lemon
Vanilla essence- 1 tsp
Grated lemon zest- 1/4 tsp
Baking powder- 1 tsp
Bicarbonate of soda- 1/4 tsp
Yogurt- 1/2 tbsp

Method:
Preheat the oven to 190 degree Celsius.  Grease and line a mini loaf tin.  Sift together the flour, baking powder  and bicarbonate of soda in a large bowl.  Beat together the butter and sugar in a bowl with a electric mixer.  When it looks fluffy add the egg and beat well.  Add the egg and beat again.  Now add the flour mixture, lemon juice, grated lemon zest and vanilla.  Beat all the ingredients to combine well.  Finally add the fresh grated coconut and stir.
Pour the mixture into the prepared tin and bake it in the preheated oven for 20-25 minutes or until a skewer inserted comes out clean.  Take it out from the oven, leave it cool in the tin for 5 minutes.  Gently remove from the tin,slice and serve.

Note:
The bread is too soft and moist, so take care while slicing it, so that they don't break.

Linking this recipe to Cakes,Cookies and Desserts.

reade more... Résuméabuiyad

Paneer Mutter Masala

Paneer Mutter Masala is again something very special which we would like to order in a restaurant.  Every home cook will have their own version for this gravy with few minor changes.  When it comes to these restaurant special gravies like Butter Chicken, Paneer Makhani etc.
There is always one recipe which I totally depend on is,Varevah.  Almost everybody who watched  his video recipes will definitely start following his recipes.  His videos are always simple and easy to follow and interesting to watch too.  Needless to say his recipe never fails, no wonder he has got so many fans.

Whenever I had these gravies like paneer makhani or paneer mutter masala, I never thought it would be so easy for me to make at home.  Sometimes it makes you feel really good when you are able to recreate this restaurant menu at home.  With big thanks to Varevah for sharing this recipe, let's see how to make it.

Preparation Time:10 minutes
Cooking Time: 40 minutes
Serves 4

Ingredients:
Paneer- 100 gms ( diced in cubes )
Peas- 200 gms ( boiled )
Onion- 1 big sized chopped finely
Tomato- 2 medium sized chopped finely
Ginger garlic paste-1 tsp
Chilly powder- 1 tsp
Coriander powder- 2 tsp
Garam masala- 1/2 tsp
Kasoori methi-1 tsp
Cashew nut-4 nuts
Ketchup- 2 tsp
Cumin seeds-1 tsp
Cinnamonstick- 1/2 inch stick
Oil- 1 tbsp
Salt to taste
Cream-2 tsp ( optional )

Method:
Boil the peas and keep it separately.  Heat oil in a pan, add cumin seeds and cinnamon stick.  After a minute,add ginger garlic paste, keep the heat in medium and stir well.  Now add the cashews and onions , stir well until they looks transparent.  To get the onions cooked quickly, you can add a little bit of salt. Now add the tomatoes and stir well.  Cover the pan and cook till the tomatoes get soft and mushy.  Now add kasurimethi,chilly powder and coriander powder to it.  Add some water , cover the pan and cook till it looks like gravy.  After few minutes,switch of the stove.  Blend the mixture in a blender until  it's pureed well.  Pour the ground mixture again in a pan and start cooking it in medium heat.  Now add the ketchup and salt to taste.  Add the diced paneer and cooked peas.  Cover the pan and let  it cook for a minute or two.  Finally add the garam masala and stir well.  Just before serving, you can drizzle some cream on top or just serve it without cream with naan or roti's.

Linking this recipe with Comfort Food 


reade more... Résuméabuiyad

'Healthy Morsels' - Coming Soon

Three girls, three different personalities, crossed their ways in Germany. They had one special thing in common among others - they are great foodies!! The trio, Umm Mymoonah of Taste of Pearl City, Reshmi Ahmed of Lecker and Yummy Recipes and Aysha of Schmetterling Words, got inspired by each other, to learn about food and healthy diet, different dishes, different cuisines, from cooking to baking, started blogging and sharing our culinary expeditions with the world. We have tread a good way so far, but being the lady of the house, the quest to consciously feed the family with healthy yet tasty food has always been a sweet challenge to us.
The human body and mind, when it comes to food, are faced with different needs at different stages of our life. A balanced diet is essential for a healthy body and a healthy soul. Our ancestors have understood this simple mantra very well and laid importance in the art of food making and healthy diet. A Tamil proverb goes, 'Unave marundhu', meaning 'Food is medicine'. A proper nutrition itself is a medicine and works preventive against diseases. This shows how important food is for a healthy life. Today's life is more complex than the life some 50 years back. The fast pace of today's life just makes it more important than ever to take care of our eating habits.
With just this goal, we as a team, are now embarking on a "Healthy Morsels" journey, carrying along with us, you foodies on our board, hoping to run a tight ship and aiming to benefit every member of the family at all ages. The whole idea of "Healthy Morsels" is about sharing the wisdom of good nutrition and healthy life style with the global community. Not everyone of us is a doctor. Neither are we all dietitians. But still, we can learn from each other - from the hidden treasures of family traditions, from the hearths of learned professionals and from the indispensable expertise that comes with experience - the key to a healthy life.

Knowledge shared is knowledge gained. Are you all ready for this exciting ride with us??


About the hows, whens and whats, just stay tuned for a few more days…
reade more... Résuméabuiyad

Prawn Theeyal

As a kid I have never enjoyed theeyal, particularly when it's only with shallots or vegetables.  As I always say, now it's the reverse as I grew up.  Now I love theeyal and shallots a lot, I even enjoy raw shallots or pearl onions.  Raw shallots so good for you, in those days when you have rice leftover in home, what they do is wash the rice well and add some more water to the rice and leave it overnight, not in a refrigerator.  The next day morning they drain the water and add fresh water or sometime use the same water.  Mash up the rice well with water, add a few spoons of yogurt, freshly chopped  raw shallots and some green chillies,curry leaves.  You won't believe this gives you unbelievable stamina for the whole day.
The starch from the rice  gives you this stamina and raw pearl onion or shallots adds up lots and lots of health benefits.  Raw shallots are rich in antioxidants,vitamins and minerals.

Shallots reduces the cholesterol level in your body, also it reduces the blood sugar level. Shallots are also particularly effective against liver cancer, since shallots remove the toxins from the liver.  Regular intake of shallots also reduces the infections from stomach.  Although peeling and preparing the shallots are bit time taking work, thinking of all the health benefits, I think it's worth all the efforts.  To read more about shallots click here and here.

Coming back to our recipe here Theeyal is originally a recipe from Kerala, which is almost a similar version of pulikulambu which is prepared in Tamilnadu.  Theeyal is a tangy and spicy curry prepared with a mix of vegetables or prawns.  Theeyal can be served with rice, idli's or dosas.  In case of Prawn theeyal, it can be served with chapathi's too.

Preparation Time: 15 minutes
Cooking Time: 40-45 minutes
Serves  4

Ingredients:
Prawns ( shelled and cleaned )- 1/2 kg
Shallots- 12 ( peeled and chopped)
Tomato- 2 medium sized chopped
Tamarind- 1 lemon sized ball ( soaked in water and extract the pulp)
Chilly powder- 1 tsp
Coriander powder-2 1/2 tsp
Green chilly - 2
Curry leaves-10
Garlic-  4 pods chopped
Methi seeds- 1/4 tsp
Mustard seeds- 1/2 tsp
Fresh grated coconut- 100 g
Oil- 2 tbsp
Salt to taste

Method:
Clean and wash the prawns with little turmeric and salt.  Dry roast the coconut until it turns light brown in colour.  Mix the chilly powder and coriander powder along with the coconut, grind it to a smooth paste by adding little water.
Heat oil in a pan, add mustard seeds when they start spluttering, add methi seeds,curry leaves and garlic.  Now add the onions and stir fry until it turns translucent.  At this stage add the ground paste and stir well with out sticking to the bottom.  Now add the tomatoes, green chillies and stir well.  Cover the pan and let it cook till the tomatoes get softened.  Now add the tamarind juice and water, let it boil for few minutes.  Finally add the prawns, salt,  cover the pan and let it cook till the prawns are completely cooked.  When the colour of the prawns are changed in colour,you know it's cooked.  Leave it till oil floats on top of the curry.  Take it off from heat and serve with hot steaming rice.
reade more... Résuméabuiyad

Any One Can Cook

Any One Can Cook will be temporarily cancelled for only this week.  As you  have noticed the linky tool subscription has expired,once it gets sorted hopefully we'll continue it from next week onwards.  See you all again in next week Any One Can Cook.
reade more... Résuméabuiyad

Oats and Flaxseed Muthia

Muthia's are traditional Gujarathi snack.   It can be served as a breakfast.  The first ever time I heard about these Muthia's must be in Manjula's Kitchen.   After that in many blogs and TV shows.  A Foodie like me repeatedly comes across a recipe at different occasions what will I do, yes get tempted to try it.  That's what I did, on top of that it's steamed and healthy.

Muthia's are nothing but steamed dumplings, traditionally made with chickpea flour.  It's rolled into sausage shapes and then steamed.  The concept of using oats, I think I got it from Tarladalal,  I couldn't find the link anyway so not sure about that.  Finally I added some flaxseed, to increase it's nutritional value to one more step.   The very first time when I tasted it , I had a doubt wheather I liked it or not.   But  after gobbling a few pieces I definitely knew that I'm enjoying it.  It's just like whenever , you are introduced to a new taste, your tastebuds may not accept it.  For example , Idli's ( Steamed Rice Cakes )  are enjoyed by people from Tamil Nadu,  I was surprised  when I saw a lady from our neighbouring country, didn't like this.  She couldn't get the taste or flavour of it, since they are so much used with all wheat products.  How many of our parents or grand parents  really enjoy pizza, pasta or KFC chicken.  The fact is their mind has been already trained to Idli's, dosas, chapathi's or Rice which couldn't accept the flavours in Pasta or Pizza.
Almost everyone will have our own choice in food.  Some might love tea or coffee and there are some  who hates tea or coffee.  So in that case, what do you say tea or coffee tastes good or bad?  This happens with all food .  When we understand that every food has it's own flavour, we'll be ready to explore different food from different regions and start enjoying it.
Anyway I'm not saying that you have to train your mind to have these Muthia's, they are definitely good.  So use your imagination to play with different variations and enjoy it.

Preparation Time: 10 minutes
Cooking Time: 20 minutes
Serves 2

Ingredients:
Wheat flour- 3/4 cup
Powdered oats- 1/2 cup
Gram flour- 1/4 cup
Powdered Flax seed- 1 tbsp
Curd- 1 tbsp
Carrot- 1 medium sized grated
Lemon juice- 1 tsp
Bicarbonate of soda- 1/4 tsp
Dried fenugreek leaves- 2 tsp
Sesame seeds- 3 tsp
Mustard seeds- 1/2 tsp
Oil- 1 tbsp
Asfoetadia- a pinch
Coriander leaves- 1/2 tbsp finely chopped
Salt to taste

Method:
In a large bowl mix together the wheat flour, gram flour, oats, flax seed powder, salt and bicarbonate of soda.  Rub the fenugreek leaves in the middle of your palms and add it to the flour mixture.  Add the grated carrot and mix wellNow add the curd, lemon juice and enough to make a soft dough.  Cover the dough and let it rest for 5 minutes.  Divide the dough into 3 equal rounds.  Roll them into sausage shape.  Place it in a steamer, I used idli plates in a pressure cooker, you can use the steamer if you have one.
Steam it for about 20 minutes, insert a knife or toothpick to check if it's cooked.  If the knife or toothpick comes out clean, then it's cooked.  Remove it from the steamer, let it cool down for a while.  Slice them into 1 cm round discs.  Heat oil in a wide open, add mustard seeds, sesame seeds and asfoetadia.  Add the sliced mutias and saute it until the colour changes and get slightly crisp.  These muthias are at it's best with green chutney, I liked it with idli podi too. 

Note:
Instead of carrot, doodhi or cabbage can also be used.  When are using doodhi, try to squeeze out all the water before mixing it with flour.

Sending these Muthias to Only Oats by Foodelicious, Healthy and Hearty, Carrot Recipes


reade more... Résuméabuiyad

Aatu Kaal Paaya ( Smoked leg of lamb cooked in a spicy sauce )

After removing the skin of goat or lamb, it can be used from head to toe.  Every single part starting from head can be eaten.  Head is used for head curry, even tongue and nose also used, it might bit dodgy if you are a vegetarian. The meat, intenstine, liver, brain everything is used for different preparation.  To be more clear, the blood is also consumed.  Paaya is prepared using the feet of lamb or goat.  When it comes to feet or leg , the skin cannot be peeled completely, so it's left out with a few hairy parts.


This feet or leg of lamb with hairy parts  cannot be used directly for any recipe.  Hence this is smoked or burnt completely until it burns out all the hairy parts outside .  This can be done only by butchers, not in home.  To read about this might be bit yucky,  but this is just a piece of information who have never heard the word paaya.  In case you have lost your interest after reading this, please don't.  This recipe bursts with flavours and also very good for your bones and joints.  Any non veg lover will love this,  appam with paaya or idyapaam with paaya is such a well known popular combination.  It does taste good with chapathi's and rice too.  So instead of your regular chicken or lamb curries and stews, try this for a change next time, you'll surely love it.


Preparation Time: 10 minutes
Cooking Time:  45 minutes
Serves 4

Ingredients:
Smoked feet- 2 sets ( which means 2 feet and leg of lamb chopped into pieces)
Ginger garlic paste- 2 tsp
Onion- 1 medium sized finely chopped
Tomato- 1 medium sized finely chopped
Cinnamon- 1/2 inch stick
Cardamom- 1
Cloves- 1
Bay leaf- 1 small leaf
Chilly powder- 1/2 tsp
Coriander powder- 1 tsp
Freshly ground pepper and cumin- 1/2 tbsp ( take equal amount of pepper and cumin and ground it coarsely )
Coriander leaves- 1 tbsp finely chopped
Coconut milk- 100 ml
Oil- 1 tbsp
Salt to taste

Method:
Wash the smoked feet well in water, rubbing the few burnt parts.  Heat oil in a pressure cooker, add all the whole spices, cinnamon, cardamom, cloves and bay leaves.  Then add onions and ginger garlic paste.  Saute well until the raw smell goes and it looks light brown in colour.  Now add the tomatoes and saute till they look mushy.  Now add the chilly powder and coriander powder and mix it well.  Now add the leg of lamb and mix it well.  Add lots of water, until it looks completely immersed and the water level is well above the top.  At this stage add the freshly ground pepper and cumin.   Cover the cooker with it's lid, put the whistle.  Cook it for upto 10 whistles.
Generally it takes very long time to cook.  If it looks hard after 10 whistles, cook it for another 5 more whistles.  At this stage add coconut milk, coriander leaves and salt.  Cook it for another 3 whistles.  To check if it's cooked properly, when you touch it should be very soft and the meat should come of from the bone very easily.  Now you know it's ready, take it off from heat.  Serve while they are still warm with idiyappam, appam, rice or chapathi's.
reade more... Résuméabuiyad

Any One Can Cook: Series 42

Hello Foodies,

Every week we are stepping in to a new successful series.  I have to say the whole success of this event is only because of all those wonderful bloggers who contribute their recipe for the event.  Thank you everyone, hope I would get the same support in the oncoming series too.  If you are a new reader to this blog, please read more about the event here.
Here are the three selected recipes from last week
Onion Raita by My Cook Book

Paneer Sandwich by Vegetarian Food and Me

Oreo Milk Shake by Mad Cooking Fusion
If you would like to get featured here, keep linking your  recipes which suits this event in the below link, if you find any trouble in linking, email me your recipe URL to ayeesha.riaz@googlemail.com.
reade more... Résuméabuiyad

Thalassery Chicken Biryani

Although Biryani  is said to be originated from Iran to India through merchants and travellers,  in India it has many different versions. It took it's  own version according to the local region.  Each one has it's unique flavour. Thalassery  Biryani is a popular version from Kerala Cuisine. Thalaserry is a city named in Malabar,Kerala.  This Biryani is very popular in  the whole belt of Malabar region  and hence also known as Malabar Biryani.


I personally think that, biryani's are at their best with mutton,of course if you are a chicken or seafood lover, you can go with that.  Today I made this Thalaserry biryani with chicken, having my kids priority as my first choice, I have to go for chicken, you can also replace it  with mutton too but not sure about seafood.  I hope you are now ready to try this Biryani for this weekend.


Ingredients:
Chicken- 1/2 kg
Basmathi Rice- 2 cups
Cinnamon-1/2 inch stick
Cardamom- 2
Cloves-2
Bay leaves- 1
Star Anise-1
Fennel powder- 2 tsp
Chilly powder- 1 tsp
Coriander powder- 3 tsp
Cumin powder-1 tsp
Pepper powder-1/2 tsp
Nutmeg powder-1/2tsp
Garam masala- 1/2 tsp
Ginger garlic paste- 3 tsp
Onion- 2 medium sized ( finely sliced )
Tomato- 1 chopped
Green chilly- 2
Lemon juice -1/2 tbsp
Coriander and mint leaves-2 tbsp chopped
Cashew nuts- 10 nos
Curry leaves- 1 spring
Coconut milk- 100 ml
Ghee/Oil- 4 tbsp
Salt to taste

Method:
Wash and clean the chicken well.  Marinate the chicken with lemon juice, ginger garlic paste, fennel powder and little salt for minimum of 2 hours.  Heat ghee or oil in a heavy bottom kadai.  Fry about 5 cashew nuts until they look golden brown in colour, remove it and keep it aside.  Then add about quarter of the onions and fry until they look golden brown in colour ,  remove the fried onions and keep it aside. 
Now  add the cinnamon,cardamom, bay leaves, star anise, cloves and curry leaves to the same oil.  Then add the remaining onions and fry until they look light brown in colour.  Now  add the tomatoes and green chilly and saute it for a minute or two.  At this stage add the chicken and stir well.  Cover the pan, keep the flame in medium heat and let it cook for about few minutes until the chicken is half cooked.  Meanwhile grind together the remaining cashew nuts and coconut milk.  Now check the chicken and add all the masala powder and stir well.  Let it cook  for about 5 more minutes.  
At this stage add the ground cashew and coconut milk mixture .  Finally add the chopped coriander and mint leaves and salt to taste.  Cover the pan, keep the flame in medium and cook until the chicken is completely cooked.  Meanwhile start cooking the rice,  wash the rice well,  add 2 cups of water to 2 cups of rice,enough salt and cook it in a pressure cooker for 1 whistle.  Once the chicken is done, mix the chicken along with the gravy to the rice.  Keep the flame in low and let it rest for about 10 minutes.   After 10 minutes,  switch of the flame  and keep the cooker or pan in same stove to retain the heat.  After 20 minutes, remove it from stove, give it a gentle stir.  Finally add the fried onions and cashews for garnish.  Serve the biryani's warm with raita, boiled eggs and may be dalcha too.

Note:
Incase if you get confused with the amount of rice and chicken, the thumb rule is to use equal quantity of rice and meat i.e. If you are  using 1/2 kg of rice , then use 1/2 kg chicken.  If you are not a very good meat eater, you can reduce the amount of chicken a little bit.
Also either mutton or chicken, whatever you are using for biryani, use it along with bones, since they give out the best flavours.

This recipe goes to Kerala Kitchen Event hosted by Roshan's Cucina


reade more... Résuméabuiyad

Any One Can Cook : Series 41

Hello Foodies,

This is our successful 41st series of Any One Can Cook.  I really wanted to thank each and everyone who support this event by submitting your entries.  I hope you enjoy this and make use of it too.  Looking forward to more enthusiastic support in the oncoming series.  If you are a new reader to this blog, please read more about the event here.
Here is our three selected recipes from last week series
Orange Twister  by Preeti's Kitchen Life

Chocolate Espresso Mug Cake by Kurry leaves

Strawberry Yogurt by Spicy Food
If you would like to get featured here, keep linking your easy to make recipes in the below link, if you find any trouble in linking, email me your recipe URL to ayeesha.riaz@googlemail.com.

reade more... Résuméabuiyad

Nutella Banana Bread for World Nutella Day 2012

It's that time of the year to drool over Nutella again, actually there isn't  one day of the year to drool or eat Nutella.  Sara from Ms.Adventures in Italy and Michelle from Bleeding Espresso are the two wonderful hosts of our World Nutella Day.  This day bloggers from all over the world unite to celebrate and enjoy this yummy Nutella.  Last year I made these Nutella Cake Pops for World Nutella Day.  This year I was bit sick and feeling tired, still I didn't want to give up, so some how I managed to whip up this quick bread.


  You'll hardly need 5 minutes to prepare this cake.  This quick bread can be enjoyed as a breakfast or just as a tea time snack but today it's only for Nutella day, a big thumbs up to Nutella on this World Nutella Day.

Preparation Time: 5 minutes.
Cooking Time: 25 - 30 minutes.
Makes 2 mini loaves.

Ingredients
Whole Wheat Flour / Plain Four - 230 gm
Brown Sugar - 75 gm
Sunflower Oil - 113 ml
Milk - 60 ml
Nutella - 3 generous tbsp
Banana - 2 mashed
Eggs - 2 nos
Baking Powder - 2 tsp
Bicarbonate of Soda - 1/4 tsp
Vanilla Essence - 1 tsp
Walnuts - 10 nos (chopped)

Method
Preheat the oven to 190 degree Celsius.  Grease and line 2 mini loaf tins.
Sift the flour, baking powder, bicarbonate of soda in a large bowl.  Mix the sugar along with the flour to give a dry mixture.  Mash the banana in a separate bowl and beat in the eggs, milk, oil and vanilla essence with it to give a wet mixture.  Slowly add the wet mixture to the dry mixture.  Gently fold the mixture to just combine.  The mixture will look quite lumpy but do not over mix it as it will result in a stodgy bread.  Finally fold in the chopped nuts.  Pour the mixture into the prepared tins and bake it in the preheated oven for 25 to 30 minutes or until a skewer inserted comes out clean.  
Take it out from the oven and leave it to cool in the wire rack for 5 minutes.  Slice the breads and serve while they are still warm with honey and bananas or just on their own. 
This recipe is linked with World Nutella Day 2012.


reade more... Résuméabuiyad

Kolhapuri Sukka Chicken

Are you ready for a hot and fiery  dry chicken curry, then this Kolhapuri Sukka Chicken is for you.  Kolhapuri is a city situated in South western part of Maharashtra, India.  I assume that the recipe should be named after the city.  Kolhapuri is a very hot and spicy chicken, being born and brought up in India, I have never used so many different spices  in one dish.
  After looking at the number of chillies in the  actual recipe, Iwasquite thrilled so I almost reduced it to half and thought still it's going to be hot, but actually not.  So the recipe which I have given here is not very hot, if you would like  to really feel the heat, you can increase the amount of chillies.

Also don't get exhausted by looking at the long list of spices and process involved, at the end you'll feel that it's worth all the efforts.  This is perfect with chapathi's, kulchas or parathas.


Ingredients:
Chicken- 1 kg
Kolhapuri dry chutney- 1 teaspoon ( recipe below )
Sesame seeds- 1 tbsp
Poppy seeds-1 tbsp
Black peppercorns- 6 to 8
Caraway seeds-  1 tsp
Cinnamon-1 inch stick
Green  cardamom- 2
Black cardamom- 1
Cloves- 2
Mace- 1blade
Fresh grated coconut- 1tbsp
Melon seeds-  1tbsp
Dried Red chillies- 7 to 8
Ginger garlic paste-2 tsp
Onion-  3 medium sized finely chopped
Turmeric powder- 1/4 tsp
Grated nutmeg- a pinch
Fresh coriander leaves- 2 tbsp chopped
Salt to taste
Oil- 3 tbsp

Method:
Dry roast sesame seeds,poppy seeds,black pepper corns,caraway, cinnamon, cloves, mace, green and  black cardamom separately.  Roast the coconut separately until it looks light brown in colour.  Grind together the spices, coconut,  melon seeds  and  about 5 dried red  chillies into a fine paste by adding little water.
Heat 2 tbsp of oil in a kadai,  add the chopped onions  and  ginger garlic paste  and cook it until it looks light brown in colour .   Add the ground paste and stir well for 3 minutes.  Now add the chicken pieces and keep stirring in high heat until the spices coat the chicken well.   Add enough water to cook the chicken and cook it for another 4 minutes.  Now add the grated nutmeg, kolhapuri chutney and salt.  Cover the pan and let it cook in medium heat until the chicken is cooked well.  If you want it dry,let it cook for some more time and let all the water evaporate.  Finally heat oil in a kadai, add the dried red chillies, leave it for few seconds and pour it on top of the curry and add the chopped coriander leaves on top for garnish.  Serve warm with chapathi's or parathas.

Kolhapuri Dry Chutney :
Coriander seeds- 1 tsp
Cumin seeds-1/2tsp
Cinnamon-1/2 inch stick
Cloves- 2
Fennel seeds- 1/4 tsp
Grated Coconut- 1/2 tbsp
Onion- 2 tbsp (chopped)
Garlic- 2 cloves
Coriander leaves- 1/2 tbsp ( chopped )
Red chilly powder- 1 tsp

Dry roast the coriander seeds, cumin seeds, cinnamon, cloves and fennel seeds and set aside separately.  Dry roast the coconut until it looks light brown and keep aside separately.  Heat oil in a pan, add the onions, garlic and coriander leaves until it looks brown and crisp.  Grind  all the ingredients along with the red chilly powder into a fine paste.  This recipe might yield about 1- 2 tbsp of masala.  Use just 1 tsp for the recipe and store the remaining in a air tight container in the refrigerator.


reade more... Résuméabuiyad