Pages

.

Showing posts with label Daring Bakers Challenge. Show all posts

Saffron and Cardamom Challah

Well, Well,  I know it was a very long break for me from blogging, still I dint feel like get back into blogging.  It has become almost like a restart problem for me to get back into blogging after a long time.  I was supposed to post this recipe for last month Daring Baker's.

  Although I made this recipe well ahead of time, since I knew I was going to travel to my mom's place.  Unfortunately I couldn't do any blogging or posting when I was there.  So here I am posting my very post for Daring Baker's.

Challah is a Jewish bread, which is traditionally made in the braided form.  They also make it in the form of festive knots, eight shaped, round challah, star shaped, ladder shaped and so on.  Braided bread is made of 3, 4 or 6 strands.  Since I found the 4 and 6 strands to be very complicated, I went with 3 strands and rest as knots and eight shaped challah.  To learn the different shapes of challah, click here.


Ingredients:
Plain flour- 500 g
Eggs- 3
Honey- 90 ml
Sugar- 1/2 tbsp
Saffron- 1/4 tsp soaked in warm milk
Cardamom powder- 1/2 tsp
Dried yeast- 1 tbsp
Warm water- 270 ml
Salt- 1 tsp
For Egg wash:
1 egg beaten with 1 tbsp of water.

Method:
Sift the flour and salt in a large bowl.  Add the sugar and yeast mix it well.  Make a well in the middle, add the eggs, honey, saffron, cardamom powder and warm water.  Slowly start beating with a electric beater fitted with dough hook until the dough gets incorporated and comes together.  Once the dough comes together, knead for about 10 minutes.  Take a clean oiled bowl, place the dough in the bowl.  Cover with a tea towel and let it rise in the warm place for about 2 hours until doubled in bulk.
Once the dough gets doubled, knock the air back.  Divide the dough into 5 equal parts and shape it into braids, knots or eight shape.   To make different shapes, please view here.
Preheat the oven to 190 degree Celsius.  Place the shapes in the baking tray.  Cover loosely with a oiled cover.  Let it rise in a warm place for 30 minutes.  Brush it with egg wash and bake it in the preheated oven for 30-40 minutes.  Take it out from the oven, let it cool in the rack for 10 minutes.  Serve it while they are still warm or store it in a air tight container to keep it fresh.


reade more... Résuméabuiyad

Armenian Nutmeg Cake

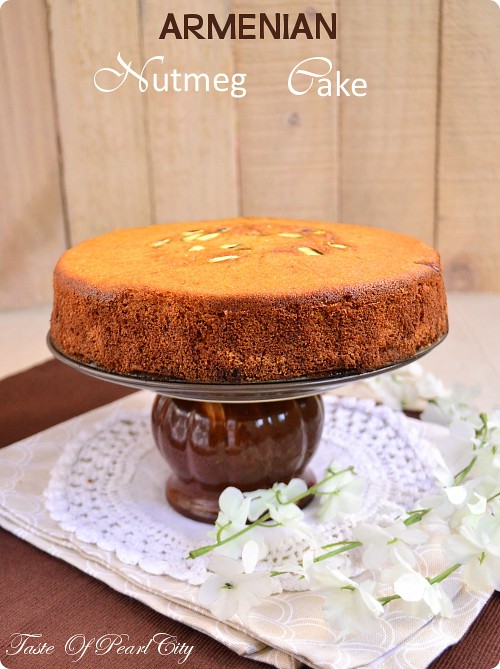
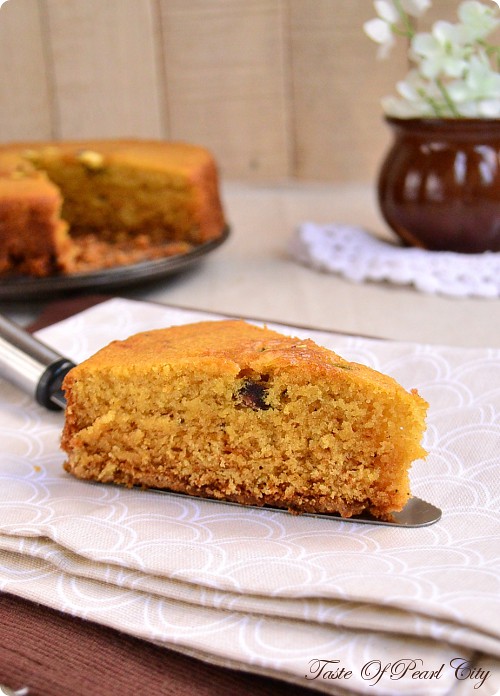
This month for Daring Baker's Challenge Jason from Daily Calender challenged us to make this Armenian delicacy. Actually we were given choice between two recipes. Nazook and Nutmeg were the choice given to us.  Nazook is a pastry filled with sweet filling and Nutmeg Cake is a slightly twisted version of coffee cake.  Although I wanted to make both the challenges, due to time constraints I made only the cake.
As always Daring Baker's Challenges are the best.  The cake turned out really good, it was soft, light and fluffy.  Perfect with a cup of tea.  Although I didn't make Nazook along with this challenge, will definitely try it soon.  Thank you Jason for this wonderful challenge.

Preparation Time: 10 minutes
Cooking Time: 30 minutes
Yields about 8 slices

Ingredients:
Plain flour- 280 gm
Milk- 240 ml
Butter- 170 gm
Brown sugar- 250 gm
Grated Nutmeg- 1 tsp
Pistachios- 50 gm
Egg-1
Bicarbonate of soda- 1 tsp
Baking powder- 2 tsp

Method:
Preheat the oven to 190 degree Celsius.  Grease and line a round cake tin.  Sift the flour and baking powder in a large bowl. Add the brown sugar and give it a mix.  Add the butter and rub it with your finger tips to make it like a bread crumbs.  Add half of the mixture in the cake tin and press it with your fingers. Mix together the milk and bicarbonate of soda.  Crack the egg in to the cake mixture and beat quickly, then add the milk and beat it with a electric mixture or whisk until it becomes lump free and smooth batter.  Pour the mixture in to the tin and sprinkle the pistachios on top.  Bake it in the preheated oven for 30 minutes or until a skewer inserted comes out clean.  Take it out from the oven, leave it to cool in the wire rack for about 5 minutes.  Remove the cake carefully from the tin and slice it into wedges.
reade more... Résuméabuiyad

Dutch Crunch Bread and Bean Sandwich for Daring Baker's Challenge March 2012

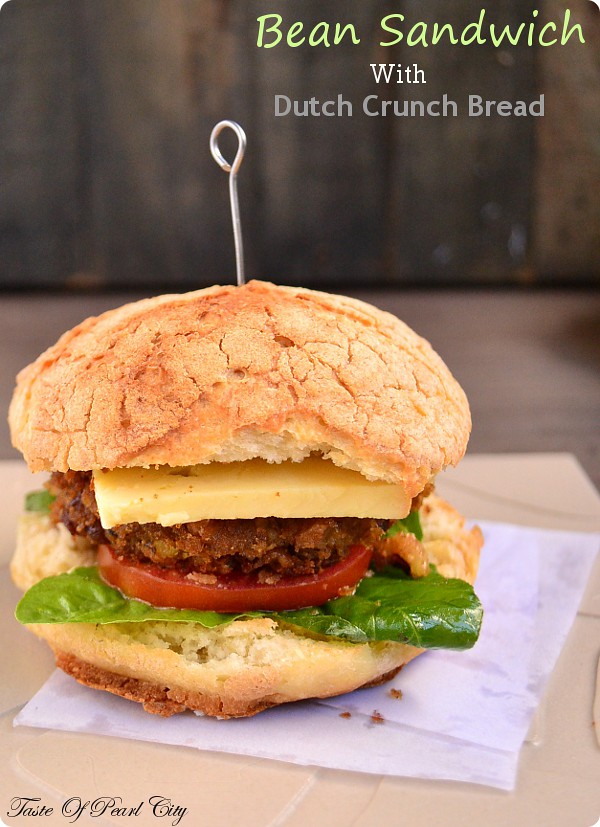
This month for Daring Baker's Challenge Sara and Erica from Baking JDs challenged us to make Dutch Crunch Bread.  Dutch crunch bread is not any particular type of bread, it's a topping which can be used for any type of bread. In Dutch it's called 'Tigerbrood' or 'Tiger Bread'  since it gets a tiger like shell on top of the bread after baking.  The end product is a sweet crunchy topping which is ideal for sandwiches.

After so many obstacles I have to bake and post this recipe.  First time, the yeast didn't work well which was my fault and the second time the yeast worked well and everything looked perfect, I happily left the bread in the oven and it didn't cook.  I was looking for a long time and it remained the same, oops! power cut.  At least if the power cut was for our whole area, I would have blamed the country's system easily but it was only in our house. It took me nearly 1 hour to figure out that the power cut was only in my house, then I have to call for an electrician and it took more than 2 hours to get everything right.  My poor bread was waiting silently in my oven in half cooked stage which spoiled the texture and topping a bit, it didn't turn out to my expectation, still it was good.  Also I was not in a mood to try it again immediately, so went ahead in posting the recipe. I used this bread for bean burger or bean sandwich, which is our favourite vegetarian option.  Thank you Sara and Erica for sharing this amazing bread with us, this is definitely a keeper.

Dutch Crunch Bread or Tigerbrood


Preparation Time: 10minutes+ rising time
Cooking Time: 30- 40 minutes
Makes 5 rolls 

Ingredients:
Soft White Rolls:
Plain flour- 500 g
Fast action dried yeast- 3/4 tbsp
Sugar- 3 tsp
Salt- 1 tsp
Oil- 1 tbsp
Warm milk- 240 ml

Dutch Crunch Topping:
Rice flour- 240 g
Yeast- 1 tbsp
Sugar- 1 tbsp
Salt- 1/2 tsp
Oil- 1 tbsp
Warm water- 240 ml

Method:
Prepare the dough:
Mix the flour,sugar, salt and yeast in a large bowl.  Make a well in the center, add the warm milk slowly and beat with a electric mixer fitted with the dough hook.  Once the dough  comes together, stop beating with electric mixer.  Knead the dough for 10minutes using your hand.  Place the dough in a clean and oiled bowl.
  Cover with a cling film and keep it in a warm place for about 1 hour or until doubled in bulk.
Once the dough has risen, knock the air back.  Divide the dough into 5 equal rounds and place it in a baking sheet.  Cover it loosely and let it rest for 30 minutes.
Meanwhile preheat the oven to 200 degree Celsius.  Apply a thick layer of Dutch crunch topping on top of each rolls.  Bake it in the preheated oven for 30 to 40 minutes or it looks lightly brown on top.

To make the Dutch crunch topping:
Mix all the ingredients together in a bowl and let it rest for about 15 minutes.  Then use it in the recipe as suggested.

Note:
The oven temperature and cooking time might vary according to different oven.


Mixed Bean Sandwich:


Bean Patties:


Preparation Time: 20 minutes
Cooking Time: 20 minutes
Makes 6 to 7 patties


Ingredients:
Mix of kidney beans,black eye beans, broad beans- 100 g
Onion- 1 finely chopped
Capsicum- 1/2 finely chopped
Curry powder- 2 tsp
Chilly powder-1/2 tsp
Flour- 1 tbsp
Bread crumbs-2 tbsp
Salt and pepper to taste
Oil for frying

Method:
Soak the dried beans in water for overnight.  Pressure cook the beans up to 4 to 5 whistles.  Completely mash the beans with a masher, add the chopped onions, capsicum, flour, chilly powder, curry powder, salt and pepper, mix it well.  If the mixture looks too crumbly, sprinkle some water to make it like a dough.  Take small sized balls, roll it and pat it like patties.  Dip the patties in the breadcrumbs completely.
Heat oil in a pan, when the oil is heat enough, drop the patties one by one and fry it till it looks golden brown on both sides.

Bean Sandwich:


Preparation Time:5 minutes
Cooking Time: 3 minutes
Makes 2 sandwich

Ingredients:
Dutch Crunch Bread- 2 rolls
Bean Patties- 2
Tomato- 2 slices
Blanched Spinach- 4 to 5 leaves
Cheese- 2 slices
Mayonnaise- 1 tbsp

Method:
Slice the bread into half.  Apply the mayonnaise at the bottom.  Place 2 to 3 spinach leaves, then a tomato slice, top it with a bean patties and a cheese slice.  Place it under a grill for about a minute until the cheese starts melting. Serve it immediately.


reade more... Résuméabuiyad

Coconut and Lemon Loaf for Daring Baker's February 2012

Daring Baker's was hosted by Lis for February 2012.  Lis challenged us to make quick breads,which I  have to quickly whip up in the last minute as always.  Lis has provided us with different sources to refer for quick breads with different flavours and versions.


Quick breads are made with quickly without kneading,rising and yeast.  Basically quick breads are made with rising agents like baking powder,bicarbonate of soda along with moist texture.  A quick bread can be either sweet or savoury,  you can play with different flavours to make your own version of quick bread.  A quick bread can be in the form of loaves,muffins or popovers.

I have choosed Coconut and lemon loaf for this challenge.   Coconut by itself is a fantastic flavours,  I know it goes well with cardamom.  I love the flavour of lemon and vanilla in any cakes, so today I wanted to try lemon and vanilla along with fresh grated coconut.  I felt the flavour of coconut in every bite, this is a super moist and yummy bread.  Since I made it in the last minute, I couldn't come out with some appealing pictures for this yummy loaf.  If you are a coconut lover, I'm sure you'll enjoy this a lot and will become your favourite once you try it.

Preparation Time: 10 minutes
Cooking Time: 20-25 minutes
Makes 1 mini loaf

Ingredients:
Plain flour- 100 g
Fresh grated coconut- 75 g
Butter- 75 g ( at room temperature )
Sugar- 75 g
Egg- 1
Lemon juice- Juice of 1/2 a lemon
Vanilla essence- 1 tsp
Grated lemon zest- 1/4 tsp
Baking powder- 1 tsp
Bicarbonate of soda- 1/4 tsp
Yogurt- 1/2 tbsp

Method:
Preheat the oven to 190 degree Celsius.  Grease and line a mini loaf tin.  Sift together the flour, baking powder  and bicarbonate of soda in a large bowl.  Beat together the butter and sugar in a bowl with a electric mixer.  When it looks fluffy add the egg and beat well.  Add the egg and beat again.  Now add the flour mixture, lemon juice, grated lemon zest and vanilla.  Beat all the ingredients to combine well.  Finally add the fresh grated coconut and stir.
Pour the mixture into the prepared tin and bake it in the preheated oven for 20-25 minutes or until a skewer inserted comes out clean.  Take it out from the oven, leave it cool in the tin for 5 minutes.  Gently remove from the tin,slice and serve.

Note:
The bread is too soft and moist, so take care while slicing it, so that they don't break.

Linking this recipe to Cakes,Cookies and Desserts.

reade more... Résuméabuiyad

Basic Scones for Daring Baker's January 2012

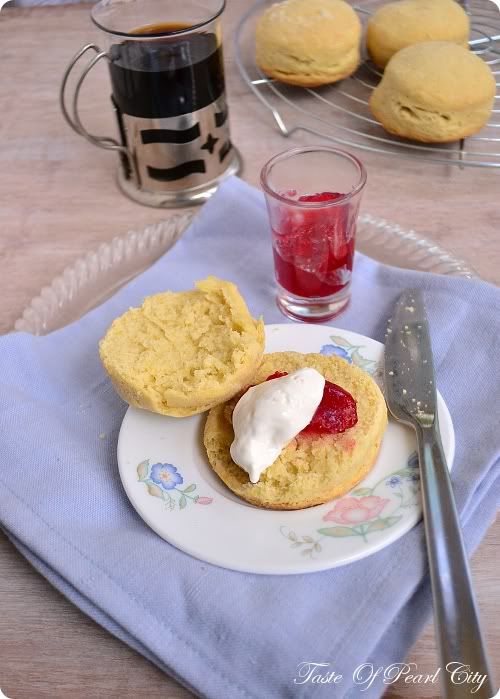
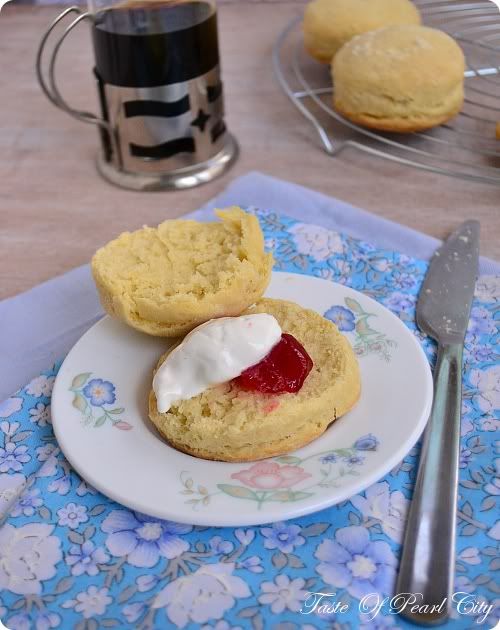
It might be Basic Scones but I have to say this is the best of all scones.  This month we were challenged to make Scones by Audax from Audax Artifex.  I have never fancied scones so much but this one is a big Wow!  The reason behind this successful and fluffy scones is AudaxAudax has explained the every single fact about this scone, which resulted in this beautiful scones.

 
There so many variations in this scones, Cream Scones, Buttermilk Scones, Fruit Scones and so many.  I highly recommend to try this Basic Scones first.  These Basic Scones are perfect when filled with some jam and clotted cream. I regret that I made a very small batch, my next try will be with wholemeal and some fresh fruits probably.   Thank you Audax for this great recipe and valuable tips, this is definitely a keeper.


Preparation Time: 10-15 minutes
Cooking Time: 10- 15 minutes
Makes 5 Scones

Ingredients:
All purpose flour- 240 g
Cold Butter- 2 tbsp
Milk- 120 ml
Baking Powder- 2 tsp
Salt a pinch

Method:
Triple sift the flour in a large bowl and mix it along with salt and baking powder.  Grate the cold butter and freeze it for about 30 minutes.  Rub the butter into the flour gently.  Add the milk and mix it into a dough using a spatula.  The dough will be quite sticky, wetter the dough lighter the scones.
Do not over work or under work the dough, both will spoil the texture.  Once the dough comes together, you can pat it gently with your fingers and cut it into scones.  If you are looking for layers, fold the dough once or twice.  Pat it gently with your fingers, dip a round cutter in a flour and cut it into rounds.
Preheat the oven to 240 degree Celsius.  Place the scones in a preheated oven for about 10 minutes, until it looks raised and lightly brown on top.  If you want a shiny top on the scones, you can glaze it with milk before baking.  Take it out from the oven, leave it to cool in a wire rack.  Serve warm scones witha dollop of Jam and fresh cream.
reade more... Résuméabuiyad

Povitica- Daring Baker's Challenge for October 2011


Hi All,  I'm back after a very long time, I can imagine what's going on when you are reading this, where did you disappear suddenly..  Well, I have some reasonable reasons for not being blogging in the past few weeks, something which is more important than blogging.
Anyways I'm back with Daring Baker's Challenge.  I would have skipped this month if I had an opportunity, but I have missed quite lots of challenges in this year, so was determined to complete this one.

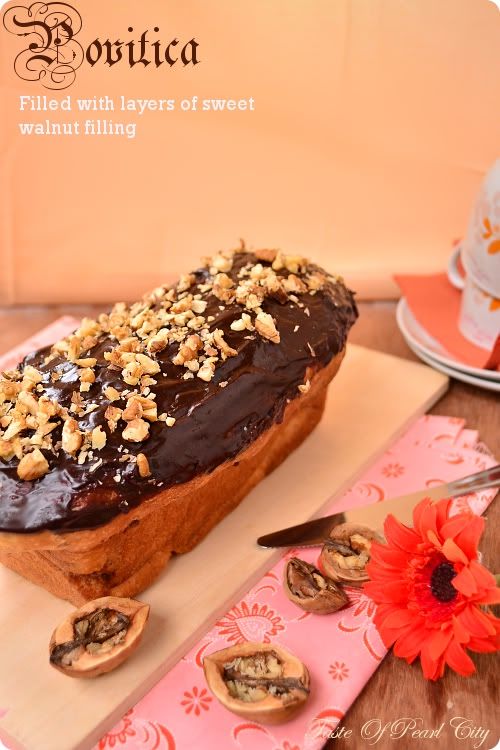
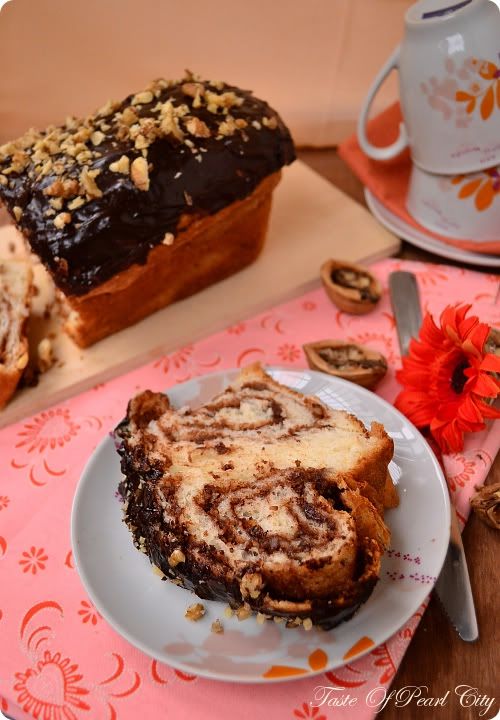
This time we were challenged by Jenni of The Gingered Whisk to make Povitica.  Povitica which is pronounced as po-va - teet - sa, is a traditional Eastern European Bread which is served during holidays.  It's also known as  Nutroll, Kalachi etc.. As I said Nutroll, just as the name suggests, this soft layered bread is filled with layers of sweet and delicious nut filling.  The actual recipe suggests walnuts, you can use your creativity to play with different filling which is sweet or savoury.

Ingredients:
For the dough:
All purpose flour- 300 g
Egg- 1/2 beaten
Dried Yeast- 1 1/2 tsp
Oil- 1/2 tbsp
Warm milk- 120 ml
Salt- 1 tsp
Sugar- 1 tbsp

For the filling:
Walnuts - 100 g
Butter- 1 tbsp
Milk- 3 tbsp
Vanilla essence- 1 tsp
Cocoa powder- 2 tsp
Egg- 1/2 beaten
Cinnamon powder- 1/4 tsp
Sugar- 1 tbsp

For the topping:
Chocolate- 100 g
Walnuts - 5 to 6 chopped finely

Method:
Prepare the dough:
Sift the flour and salt in a large bowl and mix it well, add the sugar and yeast, mix it together.  Make a well in the center, add the oil, beaten egg and warm milk.  Beat it together with a electric beater fitted with a dough hook, until the dough comes together.  Knead the dough in a floured surface for about 5 minutes.  Place the dough in a clean and oiled bowl, cover with a cling film and let it sit in a warm place until it doubles in size.

Prepare the filling:
Powder the walnuts in a blender.  Mix together the powdered nuts, sugar, cocoa, cinnamon and vanilla in a bowl. Heat the milk and butter together, until the butter gets melted completely.  Pour the hot liquid into the nut mixture and mix it together.  Quickly beat the beaten egg into the mixture and allow it to sit in room temperature, until it reaches spreadable consistency. 

Start preparing the loaf:
Take the risen dough, knock the air back.  Dust your work surface with flour and roll the dough as thin as possible.  Spread the dough with the nut mixture and start rolling the dough like a Swiss roll.  Grease a 2 lb loaf tin and place the roll inside the tin.  Cover and loosely with a foil and let it sit for 30 minutes.
Preheat the oven to 200 degree Celsius and bake the loaf in preheated oven for 15 minutes, reduce the temperature to 170 degree Celsius and bake it for further 30 to 40 minutes, until the top of the loaf look brown in colour.  Take it out from the oven and allow it to cool in the wire rack.
Once the bread is cooled down, pour the melted chocolate on top of the bread and sprinkle the chopped nuts on top.  This bread would be great as a dessert or even with a hot cup of coffee.
reade more... Résuméabuiyad

Daring Baker's Challenge For August 2011 : Candylicious

This month Daring Baker's Challenge was too sweet with full of candies, home made chocolate, barks, truffles....

Our lovely hosts for this month are Lisa from Parsley Sage, Desserts and Line Drives and Mandy of What The Fruit Cake.  The two ladies made us to dream about chocolate all night, it was a wonderful challenge. Among the given choice, I was able to make a few and few due to lack of ingredients I skipped it.  I couldn't make the Pate de fruit since I couldn't find pectin.  I did made the honey comb but I couldn't publish it since I forget to picture it, which is still resting in my fridge.  Yes unfortunately I couldn't taste one of the truffles or chocolates which I made,  since I made them when I was fasting, I pictured it and left my home before I break the fast.  It'll take an another week for me to taste those truffles.
One thing which I found very challenging was to handle the chocolate in this heat.  The room temperature is 30+ degrees here and it was quite hard to set, that's the reason why I couldn't take to my mom's place when I left home, I know it's all going to be sticky, gooey and loose all it's shape after 12 hours of journey.  So the rich chocolates are still safe in my refrigerator.  So far you have read what I didn't make for the challenge, now let's have a look at what I made for the challenge.


Ingredients:
For Bounties:
Dessicated coconut- 100 g
Condensed milk- 100 g 
Milk powder- 2 tbsp
Butter- 2 tbsp
Tempered Chocolate- about 200 g

For Peanut Butter Fudge:
Refer to the recipe here


For Truffles:
Heavy cream- 600 ml
Chocolate- 500 g 
Pistachios and almonds or cocoa to coat the truffles 

Method:
Tempered Chocolate:
Melt the chocolate on a glass bowl sitting on top simmering water. Chocolate is melted and heated until it reaches a temperature of 45 degree Celsius.  Pour it on a smooth marbled surface and move around with a scrapper until it looks thickened and cooled.  Now heat it again until it reaches a temperature of 32 degree Celsius.  Now it's ready for dipping, pouring in the moulds etc.
Note:
I haven't mentioned the amount of chocolate, use it according to your recipe suggests.

For Bounties:

Mix the condensed milk, milk powder and coconut in a pan and bring it heat .  Keep stirring until it looks thickened and leaves the sides of the pan.  Take it off from heat, quickly beat the butter and stir well.  Pour the mixture in a square tin, lined with aluminium foil.  Let it cool down completely and put them in the refrigerator for overnight to set completely.  Once set, cut them into squares and dip them in the tempered chocolate.
Warning!
Don't try to taste the coconut slices, you'll end finishing them on their own without leaving anything to be dipped in chocolate.

In the same way dip the peanut butter fudge also in the tempered chocolate and let them to set.

For Truffles:

I know I have used here quite lot of chocolates just to make the setting process quicker.  This may not work for cold climates, but to me this is the best for hotter climates.

Heat the cream in a pan just under boiling point, take it off from heat.  Quickly add the chopped chocolate and stir well until all the chocolate gets melted.  Pour it in a bowl and let it sit in the refrigerator for about 2 hours, stir them with a spoon in between.  Continue this process until it's thick enough to roll them into truffles.  Scoop out a small amount of chocolate mixture roll it into balls and then roll them in nuts or cocoa powder.

Storage:
If your room temperature is 18-20 degrees you can store it in a air tight container.  If it's more than 30+ degrees store them in the refrigerator.   


reade more... Résuméabuiyad

Baklava Rolls for Daring Baker's Challenge June 2011

Ha! Back to Daring Baker's Challenge after 2 months.  I missed last two wonderful challenges, but somehow with lots of challenges I made it up this month.  As always I did a last minute job this time also.  This month Erica of Erica's Edibles challenged us to make Baklava's with our own phyllo pastry.  Wow! Now that's quite challenging isn't, yes I really felt the heat this time, baking at nearly 38 degree Celsius.


   If I get a plate of baklava, I can never stop eating that, love it to that extend.  Although I have made baklava couple of times with shop bought phyllo pastry , this is the first time my hands on making the home made phyllo.  I have also previously posted one baklava recipe here,  which is an authentic one without any changes from the traditional.  So this time, I went with baklava rolls with some twist in it i.e Indianized twist.  Baklavas are traditionally filled with an assortment of nuts and soaked in honey and cinnamon syrup.  In this Indianized baklavas I used unsweetened khova or khoya and cashewnut as filling with saffron and cardamom syrup.
 Which was simply amazing, ahem! You can try it and give the verdict off course.  Thank you again Erica for this wonderful challenge, let's sink straight into the recipe now.
I'm not going to mention any preparation time details for this recipe, since it took quite a long time in rolling, was tired of calculating the time.

Ingredients:
For phyllo:
Plain flour- 250 g
Water- 150 ml
Oil- 45 ml
Salt-1/2 tsp

For cashew filling:
Cashew nuts- 100 g
Cardamom- 1
Sugar- 1 tbsp
Butter- 1 tbsp

For khoya filling:
Khoya- 100 g
Sugar- 1/2 tbsp

Note:
Khoya is made using milk in a large pan.  If you can't find khoya use ricotta cheese or paneer.

For syrup:
Honey- 3/4 cup
Sugar- 3/4 cup
Water- 3/4 cup
Cardamom- 2
Saffron- a pinch
Lemon juice- 1 tsp

Butter- 150 g( for brushing)

Method:
Note:
I do have the step by step pictures which I'll post it later this week.

Prepare the phyllo dough:
Add the flour, salt and oil in a mixing bowl, slowly add the water.  Using a dough tool or hand knead it into smooth elastic dough.  Once the dough comes together smoothly, knead it again for 10 to 15 minutes.  Cover the bowl  with a cling film and let it rest for minimum of 2 hours.

Prepare the filling:
Cashew filling:
Dry roast the cashew nuts in a pan until it gets heated.  Add the cashew nut, cardamom, sugar and butter to a food processor and pulse it until it looks like a coarse powder. Set it aside.

Khoya filling:
Mix the khoya and sugar together like a dough.

Roll the phyllo:
Divide the dough into 12 to 14 equal size balls.  Cover your work surface with plenty of flour, roll each ball into as thin as possible, until it looks quite transparent.  Roll out the remaining dough in the same way.

Form the rolls:
Take a sheet of phyllo pastry, brush it with melted butter and place another sheet on top it.  Make the khoya filling like a log and place it inside the pastry.  Roll out the pastry into a log.  Do the same with the cashew filling.  Place the rolls in a baking tray, brush it with melted butter on top.  Cut the log into 1 inch slices.
Preheat the oven to 180 degree Celsius and bake it for 40 to 45 minutes, until the top looks golden brown in colour.
Pour the warm syrup on top of the rolls and let it soak for 5 to 6 hours.  Since the filling is quite sweet, a little syrup would be sufficient.  You don't have to drench these rolls with syrup like regular baklava's.

To make the syrup:
Add all the syrup ingredients in a pan and bring it to boil and simmer for 10 minutes.
reade more... Résuméabuiyad

Meringue filled flower buns for Daring Baker's Challenge March 2011


This is my 8th challenge with Daring Baker's and my last challenge in Germany.  Hopefully I'll continue the challenges in India after a break.  This month our challenge was by Jamie and Ria.  Our challenge was to make Meringue filled yeasted coffee cake.  Jamie's version was sweet buns filled with meringue, chocolate and nuts. Ria's version was a saffron dough filled with meringue, cashews and a touch of garam masala.  I would have loved to make Ria's spicy and aromatic version but this time I adopted Jamie's version, next time Ria's may be.  This was so good, so definitely I'm going to make it another time.  Thank you Ria and Jamie for this wonderful challenge.


Ingredients:
For the yeasted dough:
Flour- 300 g
Sugar- 25 g
Dried yeast- 1 1/2 tsp
Milk- 90 ml
Water- 30 ml
Egg- 1
Unsalted butter- 60 g( softened)
Salt- 1/2 tsp

For the meringue:
Egg white- 1
Sugar- 30 g
Vanilla essence- 1/2 tsp
Salt- a pinch

For the filling:
Pecan nuts or walnuts- 50 g chopped
Sugar- 1 tbsp
Cinnamon powder- 1/2 tsp
Dark chocolate- 60 g chopped

Jam- 1 tbsp( for the topping)

Method:
To make the dough:
Add 150 g of flour, salt, sugar and yeast in a large mixing bowl.  Heat the milk, water and butter until the butter gets melted completely.  Add the liquid mixture to the flour mixture slowly beating with your electric mixture.  Now add the egg and remaining flour and beat with a electric mixture until it hold together like a dough. Turn the dough to a floured work surface and knead it for 5 to 10 minutes until it looks smooth and elastic.  Place the dough in a clean and oiled bowl, cover with a cling film and allow it to rise for 1 to 2 hours or until doubled in size.

Prepare the filling:
Mix all the filling ingredients together in a bowl and keep it separately.

Prepare the meringue:

Once the dough has doubled start preparing your meringue.  Beat the egg whites with salt in a clean bowl with a electric mixer.  Once it looks foamy, add the essence and sugar little by little .  Increase the speed to high and beat it until it looks stiff and glossy.

Prepare the buns:

Once the dough has risen, punch the air back.  Divide the dough into 4 equal rounds and allow it to rest for 10 minutes.

Then flatten each round , spread 1/4 th of the meringue in the middle and sprinkle with the filling mixture.

  Seal the edges and make it into a round again. Dust your working surface with flour and flatten the filled buns slightly. Take a kitchen scissors and make small cuts around the buns.

 Make a deep dimple in the middle and fill it with a tsp of strawberry or any jam of your choice.
Preheat the oven to 180 degree Celsius and bake the buns in the preheated oven for 20 to 25 minutes.  Once they are cooked,  take it from the oven and leave it to cool down in the cooling rack.
Enjoy these yeasted soft buns with a cup of tea or coffee.


reade more... Résuméabuiyad

Panacotta in Eggshell- Daring Baker's Challenge for February 2011


Our challenge for February 2011 is to make Panacotta with florentines.  This challenge was given to us by Mallory.  Panocotta is a creamy and wobbly dessert, almost everyone will love this dessert. Along with this we have to bake a crispy florentine cookies.

   When I was a kid , puddings using agar agar is something very common in my place.  Although it din't have such a smooth texture as panacotta, still agar agar puddings are my favourite.  Particularly when my mom makes it in egg shell, I just loved it.  Yes, you heard it right, it's egg shell.  Don't worry it's not going to poison you.  We always name it as sweet egg and have fun with it.  So when I saw the challenge for this month, I decided to make it in egg shell, to bring back all my childhood memories and I did some in regular glasses too.


   Coming to the cookies, the recipe which Mallory gave us was a crispy and lovely cookie.  I spoiled it and made it as a bar.  I really didn't intend to do that. I had a very long hectic day with my little ones and after that when I was making these cookies, I poured the batter in a pan instead of making like cookies.  By the time I realized that it's not going to be like cookies, I was too tired to change it from the pan again.  My apologies to Mallory.  The good thing was the bars tasted good just like flapjack.  So there you go my panacotta in egg shell  with chewy oats bar.  Thank you Mallory for this wonderful challenge. To join Daring Baker's click here


Ingredients:
For panacotta:
Whole milk- 200 ml
Single cream- 200 ml
Honey- 2 tbsp
Sugar- 2 tbsp
Cardamom powder- 1 tsp
Agar agar- 2 tbsp
Mango puree- 150 g
Egg shell- 4( if you are using)

For oats bars:
Porridge oats- 120 g
Plain flour-60 g
Brown Sugar- 150 g
Butter- 100 g
Golden syrup- 40 ml
Whole milk- 40 ml
Dark chocolate- 50 g

Method:
Panacotta


If you are using the egg shell like me, first prepare the egg shell.   Crack your egg into half, take the inside out.  Wash the shells thoroughly ( don't use any soap).  Boil the water in a pan, when the water starts boiling, immerse the egg shells for 3 to 4 minutes.  Then take it out and allow it to dry completely.
Now prepare the pannacotta.  First prepare the white layer.  Soak 1 tbsp of agar agar in cold milk for 1 hour.  Add the soaked agar agar, 100 ml of milk, 100 ml of cream, 1 tbsp of honey and sugar.  Heat it in medium to low heat.  Keep stirring continuously without burning at the bottom.  Once the agar agar looks completely dissolved, add 1/2 tsp of cardamom powder, take it off from heat.  Carefully pour the mixture into the egg shells and the remaining into small glasses or which ever dish you decide to serve.   Allow it to to set for 3 hours.
   Next prepare the mango layer.  With the remaining ingredients , prepare the panacotta in the same method as above, at the end add the mango puree and mix it well until it looks smooth.  Pour the mixture on top of the white layer in the egg shell and glasses.  Allow it to set for 3 to 4 hours.

Oats Bars:
Melt the butter in the pan.  Once the butter has melted completely add the oats, flour, sugar, syrup and milk.  Mix it to smooth.  Preheat the oven to 180 degree Celsius.  If you want to make it like bars like me, pour the mixture in a 20 cm cake tin and bake it in the preheated oven for 10 minutes or until the sides looks brown in colour.
  To make like cookies, grease and line a baking tray, pour a teaspoon full of mixture in the baking paper.  Bake it in the preheated oven for 5 to 7 minutes until it spreads and browns on the side.
Melt the chocolate and dip the cooled cookies in the chocolate and let it set until the chocolate dries out.  Store the cookies in an air tight container.
Enjoy these aromatic and creamy panacotta with oats bars.

Sending this to Western Dessert Recipes and Cooking With Fruits


reade more... Résuméabuiyad

Biscuit Joconde: Daring Baker's Challenge for January 2011


This month our challenge is given to us by Aesthroshe, she challenged us to make Biscuit Joconde, imprime/entremet. Imprime is a French baking term.  Joconde is nothing but a thin flexible cake made with different patterns.  This is used in desserts as a base or covering.  This flexible cake easily fits in the mould and it retains it's texture even after chilling.

   The moment I saw this as a challenge for this month in Daring Baker's forum, it was like a wow for me and I planned so much for  that.  Guess what !  I didn't make anything according to the plan.  I was actually planning for some nice filling like blackberry mousse, mango mousse, cheesecake, cold souffle etc...
  Since I left till the last moment, I mean very last minute, I made it only yesterday night.  So I ended up making in a simply chocolate mousse, topped with readymade custard mix and jelly.  The custard was bit wobbly and it was quite hard to hold it's shape in the mould I made.  However the joconde was absolutely amazing.  I have decided to make this for all my cold dessert as a base.  I have to say millions of thanks for Aesthroshe for this amazing recipe which she has given.

Preparation Time: For Joconde- 1 hrs
                            For Filling- 1 hr
Cooking Time: 15 minutes

Ingredients:
Joconde Sponge:
Ground Almond- 85 g
Cake flour- 25 g( for every 100 g of plain flour add 1 tbsp of cornflour)
Icing Sugar- 75 g
Eggs- 3
Egg white- 3
White granulate sugar- 1 tbsp
Butter- 30 g( melted)
Joconde decor paste:
Butter- 200 g softened
Cake flour- 170 g
Cocoa powder- 60 g
Icing Sugar- 200 g
Egg whites- 7
Filling:
Chocolate mousse:
Plain chocolate- 225 g
Butter- 30 g diced
Eggs- 3 separated
Sugar- 55g
Water- 4 tbsp
Double cream- 125 ml
Custard Topping:
Vanilla custard powder- 2 tbsp
Milk- 250 ml
Sugar- 2 tbsp
Jelly topping:
I used readymade halal jelly powder according to package instructions

Method:
Prepare the mousse:
Melt the chocolate and water in saucepan over low heat until it melts.  Remove from heat beat in the butter.  Add the egg yolks to the chocolate mixture and beat well.  Meanwhile beat the egg whites in a clean bowl until soft peaks form, slowly sprinkle the sugar little by little and continue beating until stiff peaks form.
In another bowl beat the cream until soft peaks form.
 Fold in the cream and egg white into the chocolate mixture little by little until well combined. Set aside the mousse separately.
Prepare the joconde sponge:
Beat the egg whites and  granulated sugar in aclean bowl until it looks firm and glossy. Set it aside.  Sift the flour, ground almonds, icing sugar in a large bowl.  Slowly start adding the eggs and beat it together. Fold in one third of the egg white into the flour mixture. Gently fold in the remaining egg white until well combined.  Finally fold in the melted butter. Keep this separately.
Prepare the patterned joconde paste:
Beat the butter and sugar until it looks light and fluffy.  Slowly add the egg white and continue beating until well combined.  Fold in the sifted flour and cocoa.
Prepare the pattern:
Spread a thin layer of the joconde  paste in a silicon mat.  Use a ruler to drawn inclined lines on it.  Place the silicon mat on a upside down baking sheet and slide it into the freezer. Let it sit in the freezer for approximately 15 minutes until it looks firm.

Preheat the oven to 250 degree Celsius.  Quickly pour the joconde sponge on top of the pattern.  Spread it evenly.  Bake it in the preheated oven for 15 minutes until springs back.
Take the sponge outside and immediately invert it over a sheet of baking paper sprinkled with icing sugar.
Prepare the moulds:
Take the moulds of your size and shape which you desire.  Grease the inside of the moulds with butter and line with cling film or baking parchment.  Baking parchment paper holds the filling well.
Cut a strip from the sponge such that it fits your mould.  Gently place it inside the mould and press it in the edges.
 Spoon the mousse layer inside the mould.  Then prepare the custard filling( according to your package instructions) and pour it on top of the mousse. Allow it to set.  then prepare the jelly according to package instructions and pour it on top to set.
 That's it you have your finished dessert, you can serve it with some fresh selection of fruits.


Sending this recipe to Ally's Delicious desserts

reade more... Résuméabuiyad

Stollen Wreath- Daring Baker's Challenge for December 2010


This month Daring Baker's Challenge is by Penny of Sweet Sadie's Baking.  This challenged us to make this incredible Stollen.  Challenges are tough to face it but when it is a sweet challenge like Daring Baker's Challenge, I'm sure everyone will  love it, I truly enjoy it a lot every month when I check for a Daring Baker Challenge and more than that when I make it.

   Coming to this month challenge, Stollen is a traditional German bread made during Christmas, what an appropriate challenge during this month. Stollen is bread loaded with dry fruits and candied peel, some breads are also filled with marzipan. Just baking a stollen will fill your home with the scent of festive mood,  it smells simply great. Thank you Penny for the lovely challenge you have given this month.

Preparation Time: 30 minutes+ rising time
Cooking Time: 40 minutes
Serves 8 to 10

Ingredients:
All purpose flour- 375 g
Warm milk- 100 ml
Egg- 1
Active dried yeast- 7 g
Melted Butter- 50 g
Brown sugar- 50 g
Mixed dried fruits( raisins, cranberries, currant etc..)- 75 g soaked in orange juice
Cinnamon powder- 1/2 tsp
Grated orange zest- 1/2 tsp
Grated nutmeg- 1/2 tsp
Salt- 1/2 tsp
Melted butter for brushing on top
Icing sugar for dusting on top

Method:
Sift the flour in a large, add salt, yeast, cinnamon, nutmeg, and sugar mix it well. Make a well in the center, add the melted butter and warm milk and orange zest. Mix it with a electric mixer and make it into a smooth elastic dough. Now add the soaked dry fruits and fold inside the dough. Place the dough in a clean oiled bowl, cover with a cling film and allow it to rise for 2 hours or until doubled in size. Take the dough, punch the air back. At this stage keep the dough wrapped up in refrigerator for overnight.

 Next day take the dough and leave it outside for 2 hours to return to room temperature. Then roll the dough into a rectangle, roll it up like a Swiss roll. Join the two ends together. Using kitchen scissors make cuts along outside of the dough to make it look like wreath. Cover loosely with cling film, leave it in a warm place to rise for about 1 hour or until doubled in size.

  Preheat the oven to 190 degree Celsius. Place the wreath in the preheated oven and bake it for 20 minutes, then turn the wreath to 180 degrees and bake it for another  20 minutes.
  Take it out from the oven immediately brush with butter and dust it with Icing sugar. I also made few marzipan decoration.
Enjoy making your own wreath and have fun :)

This festive wreath goes to BBD 35, Yeastspotting, Bake- Off and Suma's Baking event.
reade more... Résuméabuiyad