Pages

.

Showing posts with label Main Course. Show all posts

Rajma Masala Rice

In summer although we look out for something cool like ice creams, smoothies or drinks often, still we have to fill our tummy with some food to meet the nutritional requirements for our body.  Since aircondtioning the kitchen is not in reality here, the best way is to keep the cooking simple and quick, at the same time nutritious.
So I always look for one pot meal which is filled with grains, vegetables and pulses, which makes life much more easier.  This is one such meal which can be made in minutes.  Rajma can be replaced with any other pulses or mix of vegetables too.  Well, there isn't much to talk about anything else today, so let's move on to the recipe now.


Preparation Time: 10 minutes
Cooking Time: 20- 30 minutes
Serves 4

Ingredients:
Basmati Rice- 2 cups
Dried Red Kidney beans- 1/2 cup
Onion- 1 big sized ( chopped finely )
Tomato- 1 big sized ( chopped finely)
Ginger garlic paste- 2 tsp
Green chilly- 1
Biryani masala powder- 3 tsp
Cinnamon stick-1/2 inch stick
Cumin seeds- 1 tsp
Coriander leaves- 4 stalk chopped finely
Mint leaves - 2 stalk chopped finely
Oil- 1 tbsp
Salt to taste

Method:
Soak the kidney beans in water for 3 hours and cook it in a pressure cooker for 3 to 4 whistles.
Heat oil in a heavy bottomed vessel or pressure cooker.  Add cinnamon stick and cumin seeds.  Add ginger garlic paste, onion and saute well until the raw smell goes. Then add tomatoes and saute well. Cover the vessel with a lid and cook until tomatoes gets mashed up. Add biryani masala powder, green chilly, coriander and mint leaves.  Add the cooked kidney beans, rice, salt and 4 cups of water. If using a pressure cooker, cook upto 2 whistles.  In a normal vessel, keep the flame in medium to low and cook until the rice is done.  Serve the rice warm with just raita or any curries.

reade more... Résuméabuiyad

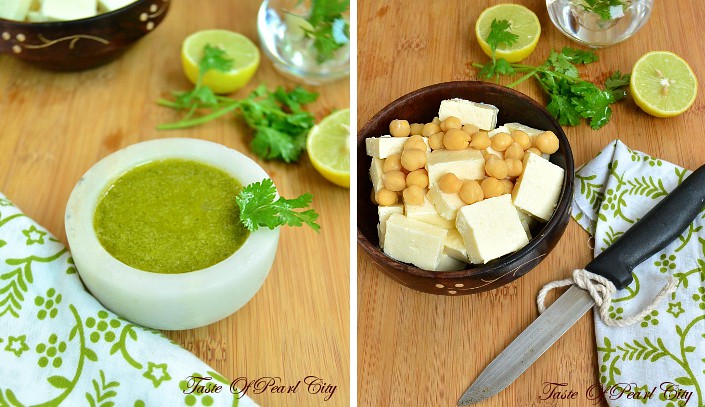
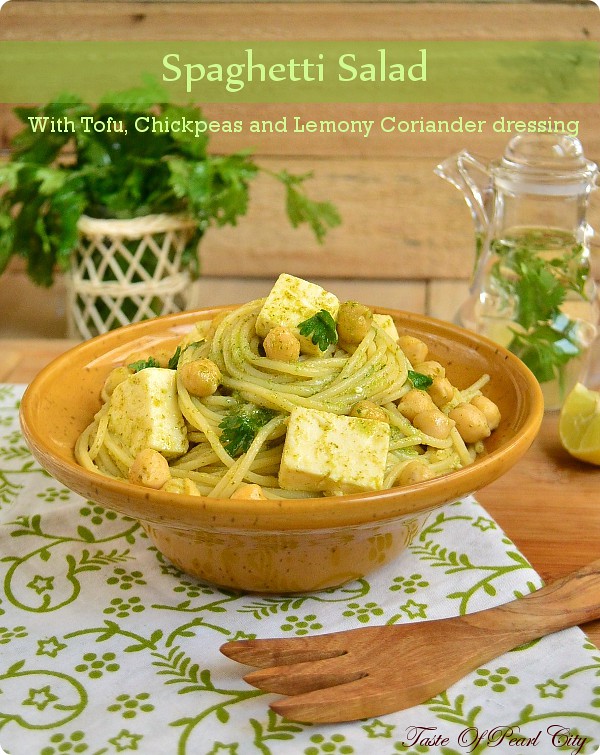
Spaghetti Salad with Tofu, Chickpeas and Lemony Coriander dressing

The title of the recipe might look quite long but that explains everything there in the recipe.  This is a very simple recipe which can be made under 10 minutes and it's nutritious too.  As we know that tofu and chickpeas are very good source of protein, this is a good alternative for vegetarians.  In a way, it's better than meat.
   Regular intake of tofu lowers your bad cholesterol, it's also rich in calcium, so this would be a better choice for those who suffer from lactose allergy. There are numerous way to use this tofu, in soup,salad, smoothies, cakes, sandwich, gravies etc.... You can search online for tofu recipes and use it the way you desire.

Coming to chickpeas, which is again a rich source of protein, lowers your blood sugar level too.  This is also rich in dietary fibre, which helps to control your weight gain. This is also a good source of folic acid and iron.  If you would like to read more about tofu and chickpeas click here and here.


Preparation Time: 10 minutes
Cooking Time: 10 minutes
Serves 2

Ingredients:
Spaghetti- 300 g
Tofu- 100 g ( diced into cubes)
Boiled chickpeas- 100 g
Coriander leaves- 6 stalks ( washed and chopped )
Garlic- 3 pods
Lemon- juice of 1 whole lemon
Olive oil- 2 tbsp
Honey- 1/4 tsp
Salt to taste

Method:

Cook the spaghetti,rinse it off in cold water and keep it separately.  Grind together coriander leaves,garlic, lemon juice, honey, olive oil and salt.  Mix together the spaghetti, tofu and chickpeas in a large bowl.  Add the sauce and toss it up well until the spaghetti, tofu and chickpeas gets coated in the sauce. At the end if you wish you can add some freshly ground black pepper, I prefer to leave it as it is. This can be served as a meal by itself along with some extra salad if required.  You can pack it for lunch.  The good thing is, it taste good even when it's cold and you can make this well ahead of time and relax yourselves.

Note:
Along with coriander leaves, you can also mint or any other herbs of your choice.  If you are not a big fan of tofu and you don't want to use them as cubes,  crumble the tofu and use it in the recipe which taste even more better.

Linking this recipe with Summer spirit, Love Lock series- Legumes started by Vidhya, Beat the Heat, Say Cheese, Bon Vivant- Savoury, Dish it Out, Cooking Concepts- Vegan Diet, Healthy Morsels- Pregnancy, Summer Splash event started by Kalyani


reade more... Résuméabuiyad

Aatu Kaal Paaya ( Smoked leg of lamb cooked in a spicy sauce )

After removing the skin of goat or lamb, it can be used from head to toe.  Every single part starting from head can be eaten.  Head is used for head curry, even tongue and nose also used, it might bit dodgy if you are a vegetarian. The meat, intenstine, liver, brain everything is used for different preparation.  To be more clear, the blood is also consumed.  Paaya is prepared using the feet of lamb or goat.  When it comes to feet or leg , the skin cannot be peeled completely, so it's left out with a few hairy parts.


This feet or leg of lamb with hairy parts  cannot be used directly for any recipe.  Hence this is smoked or burnt completely until it burns out all the hairy parts outside .  This can be done only by butchers, not in home.  To read about this might be bit yucky,  but this is just a piece of information who have never heard the word paaya.  In case you have lost your interest after reading this, please don't.  This recipe bursts with flavours and also very good for your bones and joints.  Any non veg lover will love this,  appam with paaya or idyapaam with paaya is such a well known popular combination.  It does taste good with chapathi's and rice too.  So instead of your regular chicken or lamb curries and stews, try this for a change next time, you'll surely love it.


Preparation Time: 10 minutes
Cooking Time:  45 minutes
Serves 4

Ingredients:
Smoked feet- 2 sets ( which means 2 feet and leg of lamb chopped into pieces)
Ginger garlic paste- 2 tsp
Onion- 1 medium sized finely chopped
Tomato- 1 medium sized finely chopped
Cinnamon- 1/2 inch stick
Cardamom- 1
Cloves- 1
Bay leaf- 1 small leaf
Chilly powder- 1/2 tsp
Coriander powder- 1 tsp
Freshly ground pepper and cumin- 1/2 tbsp ( take equal amount of pepper and cumin and ground it coarsely )
Coriander leaves- 1 tbsp finely chopped
Coconut milk- 100 ml
Oil- 1 tbsp
Salt to taste

Method:
Wash the smoked feet well in water, rubbing the few burnt parts.  Heat oil in a pressure cooker, add all the whole spices, cinnamon, cardamom, cloves and bay leaves.  Then add onions and ginger garlic paste.  Saute well until the raw smell goes and it looks light brown in colour.  Now add the tomatoes and saute till they look mushy.  Now add the chilly powder and coriander powder and mix it well.  Now add the leg of lamb and mix it well.  Add lots of water, until it looks completely immersed and the water level is well above the top.  At this stage add the freshly ground pepper and cumin.   Cover the cooker with it's lid, put the whistle.  Cook it for upto 10 whistles.
Generally it takes very long time to cook.  If it looks hard after 10 whistles, cook it for another 5 more whistles.  At this stage add coconut milk, coriander leaves and salt.  Cook it for another 3 whistles.  To check if it's cooked properly, when you touch it should be very soft and the meat should come of from the bone very easily.  Now you know it's ready, take it off from heat.  Serve while they are still warm with idiyappam, appam, rice or chapathi's.
reade more... Résuméabuiyad

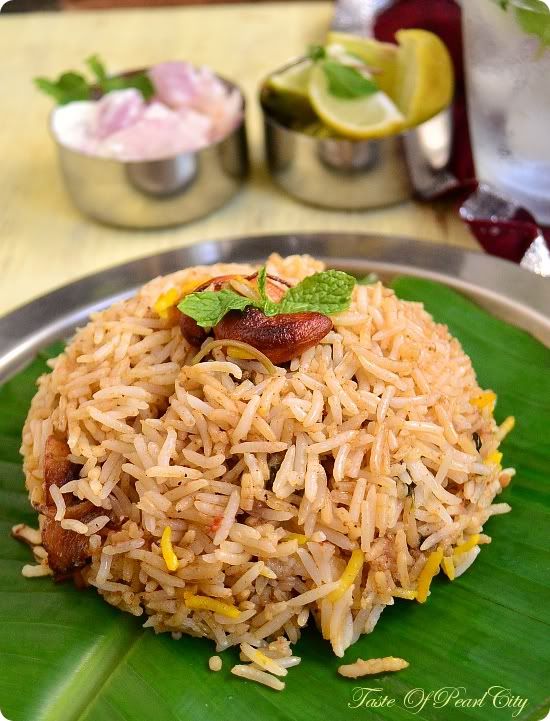
Thalassery Chicken Biryani

Although Biryani  is said to be originated from Iran to India through merchants and travellers,  in India it has many different versions. It took it's  own version according to the local region.  Each one has it's unique flavour. Thalassery  Biryani is a popular version from Kerala Cuisine. Thalaserry is a city named in Malabar,Kerala.  This Biryani is very popular in  the whole belt of Malabar region  and hence also known as Malabar Biryani.


I personally think that, biryani's are at their best with mutton,of course if you are a chicken or seafood lover, you can go with that.  Today I made this Thalaserry biryani with chicken, having my kids priority as my first choice, I have to go for chicken, you can also replace it  with mutton too but not sure about seafood.  I hope you are now ready to try this Biryani for this weekend.


Ingredients:
Chicken- 1/2 kg
Basmathi Rice- 2 cups
Cinnamon-1/2 inch stick
Cardamom- 2
Cloves-2
Bay leaves- 1
Star Anise-1
Fennel powder- 2 tsp
Chilly powder- 1 tsp
Coriander powder- 3 tsp
Cumin powder-1 tsp
Pepper powder-1/2 tsp
Nutmeg powder-1/2tsp
Garam masala- 1/2 tsp
Ginger garlic paste- 3 tsp
Onion- 2 medium sized ( finely sliced )
Tomato- 1 chopped
Green chilly- 2
Lemon juice -1/2 tbsp
Coriander and mint leaves-2 tbsp chopped
Cashew nuts- 10 nos
Curry leaves- 1 spring
Coconut milk- 100 ml
Ghee/Oil- 4 tbsp
Salt to taste

Method:
Wash and clean the chicken well.  Marinate the chicken with lemon juice, ginger garlic paste, fennel powder and little salt for minimum of 2 hours.  Heat ghee or oil in a heavy bottom kadai.  Fry about 5 cashew nuts until they look golden brown in colour, remove it and keep it aside.  Then add about quarter of the onions and fry until they look golden brown in colour ,  remove the fried onions and keep it aside. 
Now  add the cinnamon,cardamom, bay leaves, star anise, cloves and curry leaves to the same oil.  Then add the remaining onions and fry until they look light brown in colour.  Now  add the tomatoes and green chilly and saute it for a minute or two.  At this stage add the chicken and stir well.  Cover the pan, keep the flame in medium heat and let it cook for about few minutes until the chicken is half cooked.  Meanwhile grind together the remaining cashew nuts and coconut milk.  Now check the chicken and add all the masala powder and stir well.  Let it cook  for about 5 more minutes.  
At this stage add the ground cashew and coconut milk mixture .  Finally add the chopped coriander and mint leaves and salt to taste.  Cover the pan, keep the flame in medium and cook until the chicken is completely cooked.  Meanwhile start cooking the rice,  wash the rice well,  add 2 cups of water to 2 cups of rice,enough salt and cook it in a pressure cooker for 1 whistle.  Once the chicken is done, mix the chicken along with the gravy to the rice.  Keep the flame in low and let it rest for about 10 minutes.   After 10 minutes,  switch of the flame  and keep the cooker or pan in same stove to retain the heat.  After 20 minutes, remove it from stove, give it a gentle stir.  Finally add the fried onions and cashews for garnish.  Serve the biryani's warm with raita, boiled eggs and may be dalcha too.

Note:
Incase if you get confused with the amount of rice and chicken, the thumb rule is to use equal quantity of rice and meat i.e. If you are  using 1/2 kg of rice , then use 1/2 kg chicken.  If you are not a very good meat eater, you can reduce the amount of chicken a little bit.
Also either mutton or chicken, whatever you are using for biryani, use it along with bones, since they give out the best flavours.

This recipe goes to Kerala Kitchen Event hosted by Roshan's Cucina


reade more... Résuméabuiyad

Kolhapuri Sukka Chicken

Are you ready for a hot and fiery  dry chicken curry, then this Kolhapuri Sukka Chicken is for you.  Kolhapuri is a city situated in South western part of Maharashtra, India.  I assume that the recipe should be named after the city.  Kolhapuri is a very hot and spicy chicken, being born and brought up in India, I have never used so many different spices  in one dish.
  After looking at the number of chillies in the  actual recipe, Iwasquite thrilled so I almost reduced it to half and thought still it's going to be hot, but actually not.  So the recipe which I have given here is not very hot, if you would like  to really feel the heat, you can increase the amount of chillies.

Also don't get exhausted by looking at the long list of spices and process involved, at the end you'll feel that it's worth all the efforts.  This is perfect with chapathi's, kulchas or parathas.


Ingredients:
Chicken- 1 kg
Kolhapuri dry chutney- 1 teaspoon ( recipe below )
Sesame seeds- 1 tbsp
Poppy seeds-1 tbsp
Black peppercorns- 6 to 8
Caraway seeds-  1 tsp
Cinnamon-1 inch stick
Green  cardamom- 2
Black cardamom- 1
Cloves- 2
Mace- 1blade
Fresh grated coconut- 1tbsp
Melon seeds-  1tbsp
Dried Red chillies- 7 to 8
Ginger garlic paste-2 tsp
Onion-  3 medium sized finely chopped
Turmeric powder- 1/4 tsp
Grated nutmeg- a pinch
Fresh coriander leaves- 2 tbsp chopped
Salt to taste
Oil- 3 tbsp

Method:
Dry roast sesame seeds,poppy seeds,black pepper corns,caraway, cinnamon, cloves, mace, green and  black cardamom separately.  Roast the coconut separately until it looks light brown in colour.  Grind together the spices, coconut,  melon seeds  and  about 5 dried red  chillies into a fine paste by adding little water.
Heat 2 tbsp of oil in a kadai,  add the chopped onions  and  ginger garlic paste  and cook it until it looks light brown in colour .   Add the ground paste and stir well for 3 minutes.  Now add the chicken pieces and keep stirring in high heat until the spices coat the chicken well.   Add enough water to cook the chicken and cook it for another 4 minutes.  Now add the grated nutmeg, kolhapuri chutney and salt.  Cover the pan and let it cook in medium heat until the chicken is cooked well.  If you want it dry,let it cook for some more time and let all the water evaporate.  Finally heat oil in a kadai, add the dried red chillies, leave it for few seconds and pour it on top of the curry and add the chopped coriander leaves on top for garnish.  Serve warm with chapathi's or parathas.

Kolhapuri Dry Chutney :
Coriander seeds- 1 tsp
Cumin seeds-1/2tsp
Cinnamon-1/2 inch stick
Cloves- 2
Fennel seeds- 1/4 tsp
Grated Coconut- 1/2 tbsp
Onion- 2 tbsp (chopped)
Garlic- 2 cloves
Coriander leaves- 1/2 tbsp ( chopped )
Red chilly powder- 1 tsp

Dry roast the coriander seeds, cumin seeds, cinnamon, cloves and fennel seeds and set aside separately.  Dry roast the coconut until it looks light brown and keep aside separately.  Heat oil in a pan, add the onions, garlic and coriander leaves until it looks brown and crisp.  Grind  all the ingredients along with the red chilly powder into a fine paste.  This recipe might yield about 1- 2 tbsp of masala.  Use just 1 tsp for the recipe and store the remaining in a air tight container in the refrigerator.


reade more... Résuméabuiyad

Pav Bhaji - Indian Street Food

It's been a very long time since I posted two recipes in one post.  If I think about that it's quite breathtaking for me now.  I made up my mind to post this as quick as possible, so let's have a few words about the recipe and then hit straight to the recipe.  Pav Bhaji is a well known to be as  Indian street food.  In Marathi Pav means a small  loaf of bread and bhaji means vegetable dish, you can also read some interesting history and origin of this recipe from here.


Today in this recipe , the bread recipe which I have given is not pav buns, it's Buchty.  Buchty is popular in Poland and Germany, which is normally served for breakfast.  These buns are very similar to pav buns, except that the top layer is bit crusty.  These buns also goes very well with bhaji.  This unique dish can be served as a snack or a meal by itself.

Buchty

Preparation Time: 10- 15 minutes + rising time
Cooking Time: 25 minutes
Makes about 16 rolls

Ingredients:
All purpose flour-  450g
Sugar- 50 g
Butter- 2 tbsp
Eggs- 2
Milk- 120 ml
Yeast- 2 tsp
Salt- 1 tsp 

Egg wash:
Egg yolk- 1
Milk- 1 tbsp

Method:
Sift the flour in a large bowl.  Mix the salt, sugar and yeast along with the flour.  Heat the milk and butter until butter gets melted.  Make a well in the center of the flour mixture, add the eggs and slowly add the warm milk mixture, beat with a electric beater.  Once the dough comes together, knead the dough in a floured work surface for about 5 to 10 minutes.  Place the dough in a clean and oiled bowl, cover with a cling film.  Let the dough rest in a warm place for about 1 to 2 hours or until doubled in size.
Preheat the oven to 190 degree Celsius.  Take the raised dough, knock the air back.  Divide the dough into 16 equal parts.  Grease a  9 inch square tin.  Place the balls inside the tin, cover loosely with a cling film and let it rest in a warm place for about 30 minutes.  Brush the top of the bread with milk and egg.  Bake it in the preheated oven for 25 to 30 minutes or until the top of the bread looks crusty and golden brown in colour.  Take it out from the oven, remove it from the tin and let it cool in the wire rack.


Pav Bhaji masala:

Preparation Time: 20 minutes
Cooking Time: 20- 30 minutes
Serves 6 to 8

 Ingredients:
Cauliflower- 1 cup ( florets separated )  
Potatoes - 2 to 3 medium sized ( chopped )
Carrot- 2 medium sized ( chopped ) 
Peas- 1 cup
Onion- 1 medium sized ( finely chopped )
Tomatoes- 3 medium sized ( finely chopped )
Capsicum- 1 chopped
Ginger garlic paste- 2 tsp
Green chilly- 2 slit lenghtways
Pav bhaji masala- 3 tsp
Cumin seeds- 1/2 tsp
Coriander leaves- 1 tbsp ( finely chopped )
Butter- 1 tbsp
Salt to taste
Juice of 1/2 a lemon

 Method:
Immerse the cauliflower florets in hot water and wash it thoroughly.  Add cauliflower, potatoes, peas and carrot in a pressure cooker, add little water and pressure cook it for upto 1 whistle.  Mash the vegetables and keep it separately.  In another pan, heat the butter until it gets melted, add the cumin seeds, ginger garlic paste and onion, saute until the onion looks transparent in colour.  Now add the tomatoes and mix it well.  Cover the pan and cook until the tomatoes get mashed well.  Add some water to it ad let it boil for few minutes until it looks saucy.  Now add the capsicum and boiled vegetables.  Then add the pav bhaji masala, green chilly and salt.  Cover it and let it cook for few minutes, until the oil floats on top.  Finally add chopped coriander leaves and juice of 1/2 a lemon.


To Serve:
Slit a bun into half, toast with butter on both sides, spoon some gravy on the inner side of the bun, sprinkle some raw chopped onion and coriander leaves on top, serve with some lemon wedges on side, to squeeze the juice just before serving.

Note:
Don't miss the raw onion, coriander leaves and squeeze of lemon juice,it not only adds up a special flavour, it's also very good for your health.  Raw onion build immunity and coriander leaves is good for digestion, stops bad breath, keeps your lips healthy.


This recipe goes to Yeastspotting, Street Foods, New U, Healing Foods- Cauliflower hosted by Zesty Palette originally created by SiriBake Fest hosted by The Pumpkin Farm originally created by Vardhini.


reade more... Résuméabuiyad

Nellikai Sadham / Gooseberry Rice

Nellikai is the Tamil name for Amla / Gooseberry.  Amla is generally known to strengthen hair roots and for hair colouring.  Apart from that Amla has numerous nutritional values. Amla is rich in Vitamin C compared to oranges. Amla is also known to control diabetes when consumed regularly.  Read more about Amla from a few source here and here.


I have to say that this recipe is a mere replica of Lemon rice, I have followed the same recipe for lemon rice except that lemon juice is been replaced with Amla juice.  Just like lemon rice, this Amla rice also pairs well with potato fry, but in my family mutton sukka or varuval is our favourite combine which perfectly pairs with Amla rice.


Preparation Time: 10 minutes
Cooking Time: 5- 10 minutes
Serves 4

Ingredients:
Cooked Rice- 2 cups
Amla- 8- 10 ( extract the juice out of it )
Turmeric powder- 1/2 tsp
Methi powder- 1/4 tsp
Salt to taste

Seasoning:
Mustard seeds and Urad dhal- 1 tsp
Fenugreek seeds- 1/4 tsp
Dried red chillies- 3
Kurry leaves- 7 to 8 leaves
Chana dhal- 1 tsp
Peanuts- 1 tbsp
Oil- 1/2 tbsp

Method:

Wash the Amla well, blend it well in a blender by adding very little water.  Filter the juices only.  Mix the juice with turmeric powder, methi powder and salt.
Heat oil in a kadai, add mustard seeds and urad dhal, when the seeds start spluttering, add fenugreek, chana dhal, peanuts and the remaining ingredients one by one.  Fry it in low flame until the peanuts looks fried and the colour changes.  Finally add the Amla juice and let it boil for a minute, now add the cooked rice and mix well to coat all the rice with the mixture.  Take it off from flame and serve warm with Mutton sukka and poppadoms.

Sending this recipe to New U, Cooking Challenge- Flavours Of Tamilnadu , Let's Cook - Rice , Let's Cook With Leftovers , Cooking With Left Over- Kitchen Chronicles hosted by Veg Junction originally created by Kalyani, 


reade more... Résuméabuiyad

Shrimp/ Prawn Biryani

When it comes to biryani, it's always the most welcome in our family among any food. Also when it comes to any special occasion , Biryani is something which comes first.  When you have Briyani in your meals, it's definitely considered as a Royal feast.
To us briyani with mutton, chicken, vegetables or fish,anything we just enjoy it to the core.  To be honest , among all the foods sometimes I find Biryani as easy preparation, if it's a pressure cooker version.  It's a one pot dish, it's special, delicious and just a simple raita is enough to accompany a briyani, unlike other dishes, you don't have to prepare so many sides.

This recipe is a very simple shrimp/ prawn biryani.  Shrimps are more easily available than prawns, so you can use shrimps but a good quality and a good size prawns would be the best.  Don't use this same recipe to prepare mutton or chicken biryani, since the spices is bit different for this prawn biryani.  Hope you all enjoy making this simple prawn biryani in your own kitchen.


Ingredients:
Rice- 2 cups
Prawns- 1/2 kg
Ginger garlic paste- 2 tsp.
Onion- 1 big sized ( finely sliced )
Tomato- 2 medium sized  ( finely chopped )
Green chilly- 2 slit lengthways
Coriander and mint leaves-  2 tbsp ( chopped )
Chilly powder- 1 tsp
Coriander powder- 3 tsp
Turmeric powder- 1/2 tsp
Curd- 2 tbsp
Bay leaves- 1
Curry leaves- 5 to 10 leaves
Cinnamon stick- 1/2 inch stick
Fennel seeds- 1 tsp
Oil / Ghee- 3 tbsp
Salt to taste

Method:
Clean and wash the prawns well.  Mix it with salt and turmeric powder and set aside.  Heat oil/ ghee in a pressure cooker .  Add cinnamon stick, bay leaves, curry leaves and fennel seeds.  Let it fry for less than a minute, then add the finely sliced onions and ginger garlic paste.  Stir well with a spatula.  Add a pinch of salt to this onion, this helps the onion to cook faster.  Once the onion turns light brown in colour, add tomatoes and stir well.  Cover the cooker with a lid, keep the flame in medium to low and cook the tomatoes until they become soft and mushy.
Now add the prawns and stir well, add turmeric, chilly and coriander powder mix it well. Cover the cooker with the lid, keep the flame in medium and cook it until the prawns are cooked.  Now add the curd, coriander and mint leaves, finally add salt to taste.  Cover it and cook for few minutes until you get a nice thick gravy.  Now add rice and 3 cups of water.  Pressure cook for 2 whistles.  Let it rest for few minutes.  Remove the lid and give a gentle stir to mix the spices evenly with rice.  Serve warm with raita.

Sending this spicy biryani to Royal feast- Biryani and Kerala Kitchen Event hosted by Palakkad Chamayal.


reade more... Résuméabuiyad

Pumpkin Parathas with Garlic Butter

 We all know how Suhaina's Garlic rolls has won the heart of lots of all bloggers, whoever tries it for the first time will definitely fall in love with it.  The aroma released from the garlicky butter while baking is simply irresistible.  Baking home made breads and working with yeast has become something very normal and usual in these days, thanks to bloggers, cookbooks and TV shows.
  Still if you are a learner or beginner in cooking and you are not so familiar in using yeast, yet you are tempted to make garlic butter, then this is the recipe for you.  I'm not comparing these with garlic roll, since that's the best, but still this can satisfy your  garlic rolls craving in the form of soft parathas.  In normal parathas you apply plain butter or oil in the middle of the dough, in this we have replaced the plain butter with this aromatic garlic butter.  Hope enjoy making this at home.

Makes 18 to 20 parathas
Preparation Time: 20 minutes
Cooking Time: 20 minutes

Ingredients:
Wheat flour- 2 cups
Pumpkin puree- 1/2 cup
Salt- 1/2 tsp
Oil- 2 tsp
Water just enough to make a smooth dough

For the filling: ( Mix together all the ingredients to make the filling )
Butter- 2 tbsp ( at room temperature )
Grated garlic- 3 tsp
Dried Italian Herbs- 1 tsp
Salt to taste

Note:
Dried Italian herbs can also be replaced with finely chopped fresh coriander and mint leaves.

Method:
 Mix together flour and salt in a large bowl.  Make a well in the middle, add oil, pumpkin puree and enough water to make a smooth dough.  Cover the dough with a cling film and let it rest for 30 minutes.  Divide the dough into 18 to 20 equal rounds.  Flatten the dough slightly, apply garlic butter in the middle.  Cover the dough and make it into a round again.  Flatten the dough into 8 to 10 cm diameter.  Repeat the same process with the remaining dough.  Heat a tawa, place one paratha in the middle, when you see small bubble on top, turn it other side, apple little oil or ghee.  After a minute turn it to other side, apple some more ghee.  Remove it from the tawa and serve it immediately.  Serve the parathas warm with some spicy curries.  These parathas are at it's best while they are still warm.

To make pumpkin puree:
Peel and chop the pumpkin.  Stem it in a steamer for about 10 minutes, puree it in a blender without adding any water.


reade more... Résuméabuiyad

Qubuli Uzbaki ( Afghani Style Mutton Pulav )


It's time for Blog Hop Wednesdays again.  Actually I'm lagging behind now, since I missed last blog hop, this week I have decided to complete my pending work and then continue with current work.
  Last time I was paired with Shireen of Ruchik Randhap, after going through her lovely blog , my eyes got struck to her tempting non veg recipes.  I'm just posting one recipe for this blog hop, but I have bookmarked a lot from her blog.  Do visit her blog to check all her yummy recipes.


Recipe Source: Ruchik Randhap
Preparation Time: 15 minutes
Cooking Time: 1 hour
Serves 4


Ingredients:
Basmathi Rice- 2 cups
Mutton - 2 cups
Ginger garlic paste- 2 tsp
Garam masala- 1 1/2 tsp
Carrots- 2 medium sized ( julienne cut )
Onion- 1 medium sized ( sliced )
Raisins- 20 g
Almonds- 20 g
Pistas- 20 g
Mutton Stock- 3 cups
Coriander and mint leaves- 2 tbsp ( chopped )
Pinch of saffron soaked in warm milk
Salt to taste
Oil for frying and cooking

Method:
Wash the mutton well.  Add oil to the pan, then add the sliced onions and ginger garlic paste and fry until lightly golden in colour.  Now add the washed mutton pieces and stir well.  Cover the pan and cook it for 5 to 10 minutes until the water oozes out from the mutton.  Now add the garam masala, coriander leaves, mint leaves and salt.  Cover the pan and pressure cook upto 3 to 4 whistles or until the mutton looks tender.
Now take another pan, fry the carrots and nuts separately in little oil and keep it aside.
Soak the rice in water with little salt for about ten 10 minutes.  Now take a heavy bottomed pan, layer it with half of the mutton pieces, now top it with rice, continue layering with carrots and nuts.  Repeat this layers alternatively until everything is done.  Pour the saffron milk, stock and 1 cup of water.  Add enough salt to taste.  Cover the lid and cook it in medium to low heat until the rice looks well cooked and fluffy.
Serve it warm with raita and gravy.

This post is linked with Royal Feast- Biryani and  Blog Hop Wednesdays.


reade more... Résuméabuiyad