Pages

.

Showing posts with label Nonveg. Show all posts

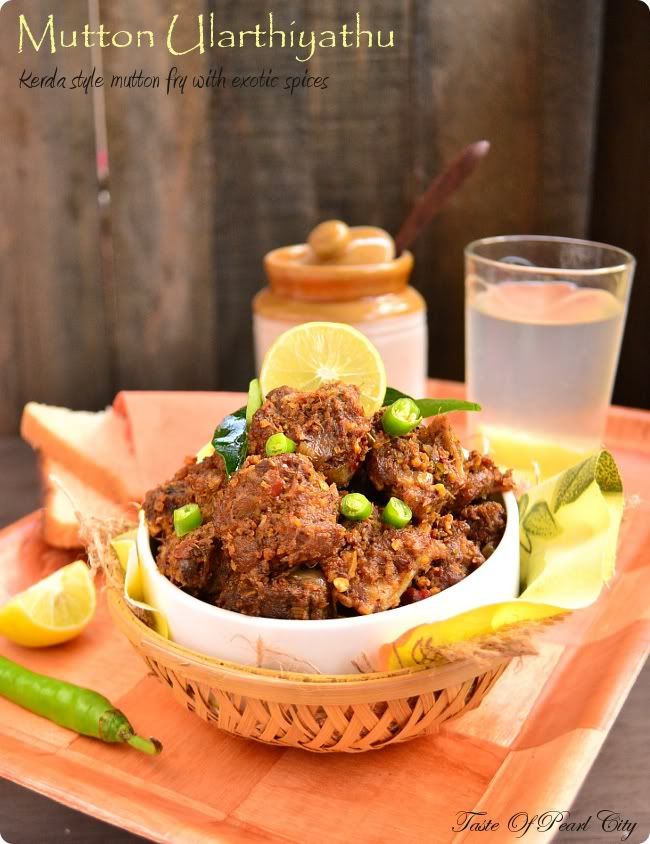
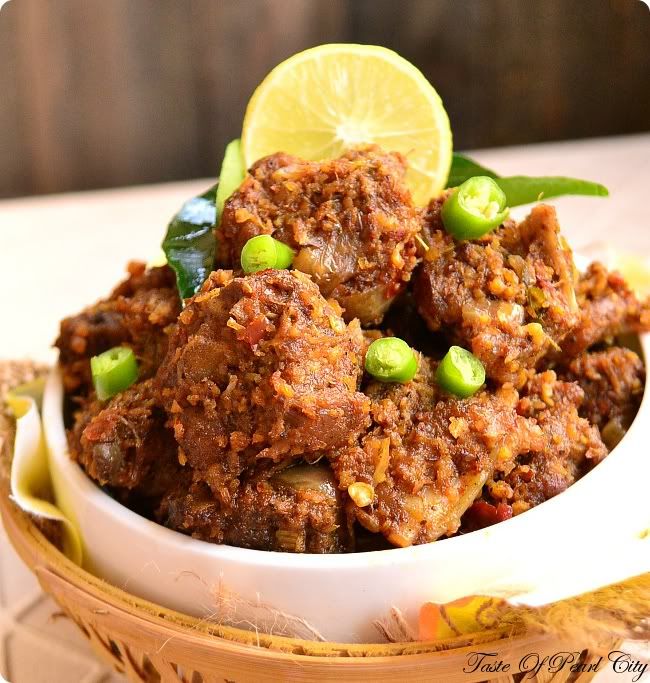
Mutton Ularthiyathu / Mutton Dry Fry

Mutton Ularthiyathu is a traditional recipe from Kerala.  Originally this recipe is made with beef, since we don't take beef much, I made this with mutton.  When it comes to Non-vegetarian, I prefer these dry fry or kebabs compared to curries or kurmas.  You can get the best of this recipe when it's prepared in a clay pot.  The aroma released from the spices while cooking might lead to even some uninvited guests ;-)
Serve this with plain white and any curries or with chapathi's, parathas and appam.


Preparation Time: 10 minutes
Cooking Time: 45 minutes-1 hour
Serves 4

Ingredients:
Mutton- 1/2 kg ( preferably boneless )
Onion- 1 medium sized ( sliced thinly )
Green chilly- 2
Ginger garlic paste- 2 tsp
Fresh grated coconut- 2 tbsp
Lemon- juice of 1/2 a lemon
Garam masala- 1/4 tsp
Turmeric powder- 1/4 tsp
Oil- 1 tbsp
Salt to taste

To be ground:
Coriander seeds- 3 tsp
Red chillies- 4
Black peppercorns- 1/2 tsp
Fennel seeds- 1/2 tsp
Cinnamon- 1/4 inch stick
Cloves- 1

Method:

1. Dry fry all the ingredients in the to be ground list and grind into a fine powder or paste by adding little 
    water.
2. Wash the mutton well, marinate with 1/2 of the ground masala, ginger garlic paste, turmeric powder,
    garam masala and lemon juice for about 1 hour.
3.  Cook the marinated mutton in a pressure cooker for upto 5 whistles without adding any water or oil.
4.  Heat oil in another kadai or heavy bottomed pan, add onions, curry leaves, green chillies and  coconut.
     Saute well until the onions look lightly brown in colour.    
5.  Now add the cooked mutton, stir well.  Add salt to taste, cover it with a lid and cook until all the water
     gets absorbed and it looks completely dry.
6.  Serve warm with rice, chapathi's or parathas.

Note:
Whole spices can also be replaced with spice powder.

Tip:
To get nice smoky flavour like barbeque, add thinly sliced lemon at the end  before switching off the stove, stir it for about 5 minutes.  Then remove the lemon before serving.
reade more... Résuméabuiyad

Prawn Theeyal

As a kid I have never enjoyed theeyal, particularly when it's only with shallots or vegetables.  As I always say, now it's the reverse as I grew up.  Now I love theeyal and shallots a lot, I even enjoy raw shallots or pearl onions.  Raw shallots so good for you, in those days when you have rice leftover in home, what they do is wash the rice well and add some more water to the rice and leave it overnight, not in a refrigerator.  The next day morning they drain the water and add fresh water or sometime use the same water.  Mash up the rice well with water, add a few spoons of yogurt, freshly chopped  raw shallots and some green chillies,curry leaves.  You won't believe this gives you unbelievable stamina for the whole day.
The starch from the rice  gives you this stamina and raw pearl onion or shallots adds up lots and lots of health benefits.  Raw shallots are rich in antioxidants,vitamins and minerals.

Shallots reduces the cholesterol level in your body, also it reduces the blood sugar level. Shallots are also particularly effective against liver cancer, since shallots remove the toxins from the liver.  Regular intake of shallots also reduces the infections from stomach.  Although peeling and preparing the shallots are bit time taking work, thinking of all the health benefits, I think it's worth all the efforts.  To read more about shallots click here and here.

Coming back to our recipe here Theeyal is originally a recipe from Kerala, which is almost a similar version of pulikulambu which is prepared in Tamilnadu.  Theeyal is a tangy and spicy curry prepared with a mix of vegetables or prawns.  Theeyal can be served with rice, idli's or dosas.  In case of Prawn theeyal, it can be served with chapathi's too.

Preparation Time: 15 minutes
Cooking Time: 40-45 minutes
Serves  4

Ingredients:
Prawns ( shelled and cleaned )- 1/2 kg
Shallots- 12 ( peeled and chopped)
Tomato- 2 medium sized chopped
Tamarind- 1 lemon sized ball ( soaked in water and extract the pulp)
Chilly powder- 1 tsp
Coriander powder-2 1/2 tsp
Green chilly - 2
Curry leaves-10
Garlic-  4 pods chopped
Methi seeds- 1/4 tsp
Mustard seeds- 1/2 tsp
Fresh grated coconut- 100 g
Oil- 2 tbsp
Salt to taste

Method:
Clean and wash the prawns with little turmeric and salt.  Dry roast the coconut until it turns light brown in colour.  Mix the chilly powder and coriander powder along with the coconut, grind it to a smooth paste by adding little water.
Heat oil in a pan, add mustard seeds when they start spluttering, add methi seeds,curry leaves and garlic.  Now add the onions and stir fry until it turns translucent.  At this stage add the ground paste and stir well with out sticking to the bottom.  Now add the tomatoes, green chillies and stir well.  Cover the pan and let it cook till the tomatoes get softened.  Now add the tamarind juice and water, let it boil for few minutes.  Finally add the prawns, salt,  cover the pan and let it cook till the prawns are completely cooked.  When the colour of the prawns are changed in colour,you know it's cooked.  Leave it till oil floats on top of the curry.  Take it off from heat and serve with hot steaming rice.
reade more... Résuméabuiyad

Aatu Kaal Paaya ( Smoked leg of lamb cooked in a spicy sauce )

After removing the skin of goat or lamb, it can be used from head to toe.  Every single part starting from head can be eaten.  Head is used for head curry, even tongue and nose also used, it might bit dodgy if you are a vegetarian. The meat, intenstine, liver, brain everything is used for different preparation.  To be more clear, the blood is also consumed.  Paaya is prepared using the feet of lamb or goat.  When it comes to feet or leg , the skin cannot be peeled completely, so it's left out with a few hairy parts.


This feet or leg of lamb with hairy parts  cannot be used directly for any recipe.  Hence this is smoked or burnt completely until it burns out all the hairy parts outside .  This can be done only by butchers, not in home.  To read about this might be bit yucky,  but this is just a piece of information who have never heard the word paaya.  In case you have lost your interest after reading this, please don't.  This recipe bursts with flavours and also very good for your bones and joints.  Any non veg lover will love this,  appam with paaya or idyapaam with paaya is such a well known popular combination.  It does taste good with chapathi's and rice too.  So instead of your regular chicken or lamb curries and stews, try this for a change next time, you'll surely love it.


Preparation Time: 10 minutes
Cooking Time:  45 minutes
Serves 4

Ingredients:
Smoked feet- 2 sets ( which means 2 feet and leg of lamb chopped into pieces)
Ginger garlic paste- 2 tsp
Onion- 1 medium sized finely chopped
Tomato- 1 medium sized finely chopped
Cinnamon- 1/2 inch stick
Cardamom- 1
Cloves- 1
Bay leaf- 1 small leaf
Chilly powder- 1/2 tsp
Coriander powder- 1 tsp
Freshly ground pepper and cumin- 1/2 tbsp ( take equal amount of pepper and cumin and ground it coarsely )
Coriander leaves- 1 tbsp finely chopped
Coconut milk- 100 ml
Oil- 1 tbsp
Salt to taste

Method:
Wash the smoked feet well in water, rubbing the few burnt parts.  Heat oil in a pressure cooker, add all the whole spices, cinnamon, cardamom, cloves and bay leaves.  Then add onions and ginger garlic paste.  Saute well until the raw smell goes and it looks light brown in colour.  Now add the tomatoes and saute till they look mushy.  Now add the chilly powder and coriander powder and mix it well.  Now add the leg of lamb and mix it well.  Add lots of water, until it looks completely immersed and the water level is well above the top.  At this stage add the freshly ground pepper and cumin.   Cover the cooker with it's lid, put the whistle.  Cook it for upto 10 whistles.
Generally it takes very long time to cook.  If it looks hard after 10 whistles, cook it for another 5 more whistles.  At this stage add coconut milk, coriander leaves and salt.  Cook it for another 3 whistles.  To check if it's cooked properly, when you touch it should be very soft and the meat should come of from the bone very easily.  Now you know it's ready, take it off from heat.  Serve while they are still warm with idiyappam, appam, rice or chapathi's.
reade more... Résuméabuiyad

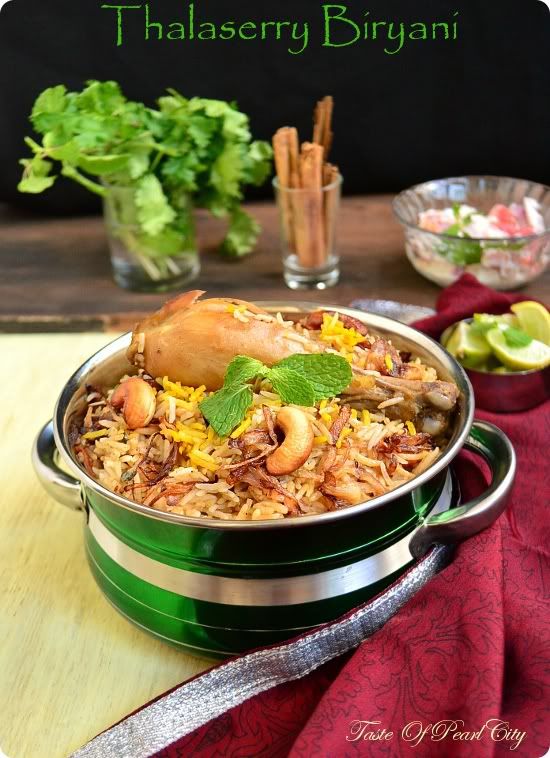
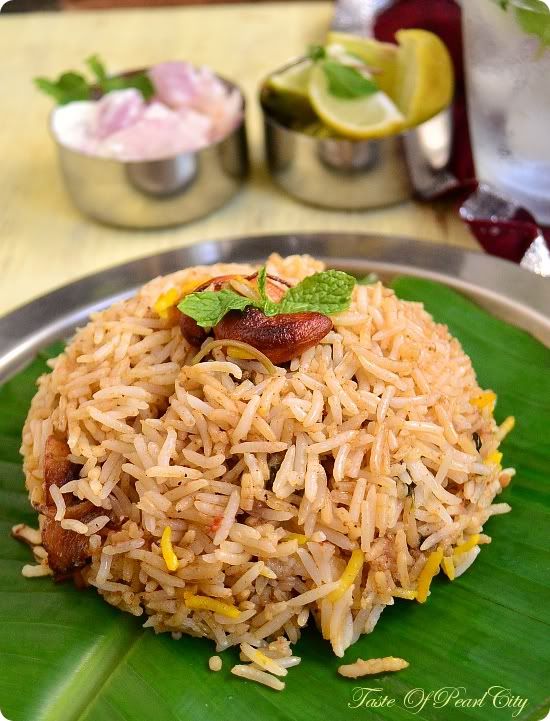
Thalassery Chicken Biryani

Although Biryani  is said to be originated from Iran to India through merchants and travellers,  in India it has many different versions. It took it's  own version according to the local region.  Each one has it's unique flavour. Thalassery  Biryani is a popular version from Kerala Cuisine. Thalaserry is a city named in Malabar,Kerala.  This Biryani is very popular in  the whole belt of Malabar region  and hence also known as Malabar Biryani.


I personally think that, biryani's are at their best with mutton,of course if you are a chicken or seafood lover, you can go with that.  Today I made this Thalaserry biryani with chicken, having my kids priority as my first choice, I have to go for chicken, you can also replace it  with mutton too but not sure about seafood.  I hope you are now ready to try this Biryani for this weekend.


Ingredients:
Chicken- 1/2 kg
Basmathi Rice- 2 cups
Cinnamon-1/2 inch stick
Cardamom- 2
Cloves-2
Bay leaves- 1
Star Anise-1
Fennel powder- 2 tsp
Chilly powder- 1 tsp
Coriander powder- 3 tsp
Cumin powder-1 tsp
Pepper powder-1/2 tsp
Nutmeg powder-1/2tsp
Garam masala- 1/2 tsp
Ginger garlic paste- 3 tsp
Onion- 2 medium sized ( finely sliced )
Tomato- 1 chopped
Green chilly- 2
Lemon juice -1/2 tbsp
Coriander and mint leaves-2 tbsp chopped
Cashew nuts- 10 nos
Curry leaves- 1 spring
Coconut milk- 100 ml
Ghee/Oil- 4 tbsp
Salt to taste

Method:
Wash and clean the chicken well.  Marinate the chicken with lemon juice, ginger garlic paste, fennel powder and little salt for minimum of 2 hours.  Heat ghee or oil in a heavy bottom kadai.  Fry about 5 cashew nuts until they look golden brown in colour, remove it and keep it aside.  Then add about quarter of the onions and fry until they look golden brown in colour ,  remove the fried onions and keep it aside. 
Now  add the cinnamon,cardamom, bay leaves, star anise, cloves and curry leaves to the same oil.  Then add the remaining onions and fry until they look light brown in colour.  Now  add the tomatoes and green chilly and saute it for a minute or two.  At this stage add the chicken and stir well.  Cover the pan, keep the flame in medium heat and let it cook for about few minutes until the chicken is half cooked.  Meanwhile grind together the remaining cashew nuts and coconut milk.  Now check the chicken and add all the masala powder and stir well.  Let it cook  for about 5 more minutes.  
At this stage add the ground cashew and coconut milk mixture .  Finally add the chopped coriander and mint leaves and salt to taste.  Cover the pan, keep the flame in medium and cook until the chicken is completely cooked.  Meanwhile start cooking the rice,  wash the rice well,  add 2 cups of water to 2 cups of rice,enough salt and cook it in a pressure cooker for 1 whistle.  Once the chicken is done, mix the chicken along with the gravy to the rice.  Keep the flame in low and let it rest for about 10 minutes.   After 10 minutes,  switch of the flame  and keep the cooker or pan in same stove to retain the heat.  After 20 minutes, remove it from stove, give it a gentle stir.  Finally add the fried onions and cashews for garnish.  Serve the biryani's warm with raita, boiled eggs and may be dalcha too.

Note:
Incase if you get confused with the amount of rice and chicken, the thumb rule is to use equal quantity of rice and meat i.e. If you are  using 1/2 kg of rice , then use 1/2 kg chicken.  If you are not a very good meat eater, you can reduce the amount of chicken a little bit.
Also either mutton or chicken, whatever you are using for biryani, use it along with bones, since they give out the best flavours.

This recipe goes to Kerala Kitchen Event hosted by Roshan's Cucina


reade more... Résuméabuiyad

Kolhapuri Sukka Chicken

Are you ready for a hot and fiery  dry chicken curry, then this Kolhapuri Sukka Chicken is for you.  Kolhapuri is a city situated in South western part of Maharashtra, India.  I assume that the recipe should be named after the city.  Kolhapuri is a very hot and spicy chicken, being born and brought up in India, I have never used so many different spices  in one dish.
  After looking at the number of chillies in the  actual recipe, Iwasquite thrilled so I almost reduced it to half and thought still it's going to be hot, but actually not.  So the recipe which I have given here is not very hot, if you would like  to really feel the heat, you can increase the amount of chillies.

Also don't get exhausted by looking at the long list of spices and process involved, at the end you'll feel that it's worth all the efforts.  This is perfect with chapathi's, kulchas or parathas.


Ingredients:
Chicken- 1 kg
Kolhapuri dry chutney- 1 teaspoon ( recipe below )
Sesame seeds- 1 tbsp
Poppy seeds-1 tbsp
Black peppercorns- 6 to 8
Caraway seeds-  1 tsp
Cinnamon-1 inch stick
Green  cardamom- 2
Black cardamom- 1
Cloves- 2
Mace- 1blade
Fresh grated coconut- 1tbsp
Melon seeds-  1tbsp
Dried Red chillies- 7 to 8
Ginger garlic paste-2 tsp
Onion-  3 medium sized finely chopped
Turmeric powder- 1/4 tsp
Grated nutmeg- a pinch
Fresh coriander leaves- 2 tbsp chopped
Salt to taste
Oil- 3 tbsp

Method:
Dry roast sesame seeds,poppy seeds,black pepper corns,caraway, cinnamon, cloves, mace, green and  black cardamom separately.  Roast the coconut separately until it looks light brown in colour.  Grind together the spices, coconut,  melon seeds  and  about 5 dried red  chillies into a fine paste by adding little water.
Heat 2 tbsp of oil in a kadai,  add the chopped onions  and  ginger garlic paste  and cook it until it looks light brown in colour .   Add the ground paste and stir well for 3 minutes.  Now add the chicken pieces and keep stirring in high heat until the spices coat the chicken well.   Add enough water to cook the chicken and cook it for another 4 minutes.  Now add the grated nutmeg, kolhapuri chutney and salt.  Cover the pan and let it cook in medium heat until the chicken is cooked well.  If you want it dry,let it cook for some more time and let all the water evaporate.  Finally heat oil in a kadai, add the dried red chillies, leave it for few seconds and pour it on top of the curry and add the chopped coriander leaves on top for garnish.  Serve warm with chapathi's or parathas.

Kolhapuri Dry Chutney :
Coriander seeds- 1 tsp
Cumin seeds-1/2tsp
Cinnamon-1/2 inch stick
Cloves- 2
Fennel seeds- 1/4 tsp
Grated Coconut- 1/2 tbsp
Onion- 2 tbsp (chopped)
Garlic- 2 cloves
Coriander leaves- 1/2 tbsp ( chopped )
Red chilly powder- 1 tsp

Dry roast the coriander seeds, cumin seeds, cinnamon, cloves and fennel seeds and set aside separately.  Dry roast the coconut until it looks light brown and keep aside separately.  Heat oil in a pan, add the onions, garlic and coriander leaves until it looks brown and crisp.  Grind  all the ingredients along with the red chilly powder into a fine paste.  This recipe might yield about 1- 2 tbsp of masala.  Use just 1 tsp for the recipe and store the remaining in a air tight container in the refrigerator.


reade more... Résuméabuiyad

Qubuli Uzbaki ( Afghani Style Mutton Pulav )


It's time for Blog Hop Wednesdays again.  Actually I'm lagging behind now, since I missed last blog hop, this week I have decided to complete my pending work and then continue with current work.
  Last time I was paired with Shireen of Ruchik Randhap, after going through her lovely blog , my eyes got struck to her tempting non veg recipes.  I'm just posting one recipe for this blog hop, but I have bookmarked a lot from her blog.  Do visit her blog to check all her yummy recipes.


Recipe Source: Ruchik Randhap
Preparation Time: 15 minutes
Cooking Time: 1 hour
Serves 4


Ingredients:
Basmathi Rice- 2 cups
Mutton - 2 cups
Ginger garlic paste- 2 tsp
Garam masala- 1 1/2 tsp
Carrots- 2 medium sized ( julienne cut )
Onion- 1 medium sized ( sliced )
Raisins- 20 g
Almonds- 20 g
Pistas- 20 g
Mutton Stock- 3 cups
Coriander and mint leaves- 2 tbsp ( chopped )
Pinch of saffron soaked in warm milk
Salt to taste
Oil for frying and cooking

Method:
Wash the mutton well.  Add oil to the pan, then add the sliced onions and ginger garlic paste and fry until lightly golden in colour.  Now add the washed mutton pieces and stir well.  Cover the pan and cook it for 5 to 10 minutes until the water oozes out from the mutton.  Now add the garam masala, coriander leaves, mint leaves and salt.  Cover the pan and pressure cook upto 3 to 4 whistles or until the mutton looks tender.
Now take another pan, fry the carrots and nuts separately in little oil and keep it aside.
Soak the rice in water with little salt for about ten 10 minutes.  Now take a heavy bottomed pan, layer it with half of the mutton pieces, now top it with rice, continue layering with carrots and nuts.  Repeat this layers alternatively until everything is done.  Pour the saffron milk, stock and 1 cup of water.  Add enough salt to taste.  Cover the lid and cook it in medium to low heat until the rice looks well cooked and fluffy.
Serve it warm with raita and gravy.

This post is linked with Royal Feast- Biryani and  Blog Hop Wednesdays.


reade more... Résuméabuiyad

Mutton Pulav


This is for someone who wants something special at the same time with less spices.  Less spices, which I meant is the hotness or the chilly in the food, yes you have a lots of whole spices included in this recipe, which gives a mild flavour without any heat.  This is a recipe which I learnt from one of my Pakistani  friend.  She used to make this almost for every Eid.

  I can still remember the yummy food which I used to have in her place, pulav with kebabs , curry and finally for dessert her own home made rasmalai, truly bliss. Whenever I taste the pulav  in her place, I can feel that something is different and has a quite unique flavours, when I asked her the recipe, I found that two ingredients which gave that distinct flavours.
First Black cardamom, next aloo bukhara (dried plums).  I know most of us might use black cardamom, but dried plums may be a alien ingredient to some of us.  I tried to find some link about aloo bukhara, since I couldn't get any, posting my own image for that, taken under very low light, hope the picture is clear for you.
So, next time if you are planning for parties or any special occasion, remember this.  Hope you won't get disappointed.

Preparation Time:  15 minutes
Cooking Time: 30-40 minutes
Serves 4

Ingredients:
Basmathi Rice- 2  cups
Mutton- 1 cup
Mutton or Chicken stock- 1 cup 
Ginger garlic paste- 1/2 tbsp
Bay leaves- 1
Star anise-1
Black Cardamom- 2
Cinnamon stick- 1/2 inch stick
Cloves- 2
Cumin seeds- 2 tsp
Black pepper corns- 1 tsp
Aloo Bukhara ( Dried Plums )- 4 to 5
Cumin powder- 1 tsp
Chilly powder- 1/2 tsp
Onion- 1 medium sized ( finely chopped )
Yogurt- 1 tbsp
Turmeric powder- 1/4 tsp
Coriander leaves- 1 tbsp ( finely chopped )
Oil- 2 tbsp
Salt to taste

Method:
 Wash the mutton well with a bit of turmeric powder and set it aside.  Heat oil in a pan or cooker in which you are going to prepare your rice.  Add all the whole spices one by one, then  add ginger garlic, stir well without burning it.  Add the finely sliced onions and  saute it in medium to low heat until the onion gets nice and soft.  Add the mutton pieces, aloo bukhara, chilly , cumin powder and mix it well.  When the mutton is cooked halfway, ass the yogurt and coriander leaves, stir it well. Do not add any water while cooking the mutton.  If it looks too dry, without any water left, add about 1/2 a cup of water. Cover the pan and cook it in medium heat until the mutton gets cooked completely.  If using a pressure cooker, cook upto 3 to 4 whistles.  Once the mutton gets cooked well, add the washed rice with 1 cup of stalk, 1 cup of water and salt to taste.  Cook for 2 whistles or using a normal pan, cook until the rice is well cooked and looks nice and fluffy.

Note:
The flavour of this pulav mainly depends upon the quality of stock.  So, use good quality home made stock or stock which doesn't contain cornstarch.

Sending this recipe to Royal Feast- Biryani.

reade more... Résuméabuiyad

Karee Vadai (Meat and Lentil Fritter) My Guest Post on Cooking Varieties


This recipe is my guest post on Cooking Varieties.  Actually I was supposed to do this long back ago with any recipe using Winter Squash, since it was really just the time we moved to India, I couldn't make it.  Ms.Wan was really kind and patience with me, I really appreciate that.
Finally when I was ready to do the post, it was just a couple of days before Ramadhan, so I decided to make some Iftar related recipes, so this kari vadai (meat and lentil fritters).  Thank you Ms.Wan for giving me this wonderful opportunity.

Kari Vadai is nothing but fritters made with fritters and lentils.  I have used here Chana dhal which is nothing but yellow split pea.  You can find this in any Indian grocery stores.  This is something which we have for our Iftar with Kanji (Soup).  This vadai can be prepared with uncooked meat also, but I cooked the meat and then used for fritters, since it reduces the cooking time for vadai, aslo you don't have to worry whether the inside is cooked or not and your oil doesn't get spoiled with all the meat fat. Hope you all enjoy this recipe

Preparation Time: 20 minutes
Cooking Time: 20 minutes
Make 15 to 20 vadai's

Ingredients:
Chana dhal (Yellow Split Pea) - 150 g
Boneless lamb- 150 g
Onion- 1 small sized finely chopped
Ginger garlic paste- 2 tsp
Cumin seeds- 1 tsp
Fennel seeds- 1 tsp
Chilli powder- 1 tsp
Garam masala- 1 tsp
Turmeric powder- 1/2 tsp
Coriander leaves- 1 tbsp finely chopped
Lemon juice- 1/2 tbsp
Salt as required
Oil for frying

Method:
Soak the chana dhal in water for 2 hours.  Finely chop the lamb pieces and marinate with turmeric, lemon juice, salt and 1/2 tsp of garam masala.  Add oil in a pan, add the meat pieces  and cook  until the meat is completed cooked.   Now grind the chana dhal by adding very little water into a thick coarse paste.  Once the dhal looks coarsely ground, add the meat and grind it again.  Meat should also look like coarse pieces in the dhal.  Now add the spices, salt, onion, chopped coriander leaves and ginger garlic paste.  Mix it well.  Heat oil in a pan to shallow fry, once the oil is hot enough to fry, make patties out of the mixture and drop it in hot oil, keep the flame in medium and cook it on both sides until it looks golden brown in colour.  Serve the hot vadai's with green chutney.


Note:
 To check the oil is hot enough, drop a small amount of mixture in the oil, if it comes bubbling up immediately then the oil is ready to fry.
Also if your mixture doen't hold well and it's too crumbly, add some gramflour or all purpose flour to hold the mixture.

Sending this to Joy From Fasting to Feasting, Iftar Nights, Serve it Only Fried, CC-Appetizers 


reade more... Résuméabuiyad

Neythili Meen Aviyal (Anchovies in Coconut based Gravy)

Neythili or Anchovies are one of the food which I enjoyed the most in my childhood.  Whenever I visit my grandma's place or aunt's place, these anchovies are must in their regular diet.  Even though when I was not a big fan of fish in my childhood, I used to love these gravies even still now.
After a very long time, I had these anchovies, that too prepared by me.  Last week when I got these, the immediate thing which I done was called my mom and asked for the recipe. Except the cleaning part of the fish, the recipe by itself is quite easy. If you can get cleaned fish directly, then that makes your life much more easier . I have used raw mango for this recipe, if you couldn't find raw mango, you can also replace it with tomatoes.  Try this recipe, I'm sure you'll love it.


Preparation Time: 10 minutes (excluding cleaning the fish)
Cooking Time: 20 minutes
Serves 4

Ingredients:
Neythili or Anchovies- 500 g
Shallots- 6 finely chopped
Raw mango- 2 small sized (sliced)
Garlic- 4 pods
Grated coconut-  5 tbsp
Green chilly- 2
Turmeric powder- 1 tsp
Chilly powder- 1 tsp
Cumin powder- 1/2 tsp
Mustard  seeds- 1 tsp
Fenugreek seeds- 1/2 tsp
Curry leaves- 10 leaves
Oil- 1 tbsp
Salt as required

Method:
Remove the head and tail part of the anchovies and clean it well in water.  Grind together coconut, turmeric and chilly powder by adding little water.  Heat oil in a pan or kadai,  add mustard seeds, fenugreek seeds, curry leaves, garlic pods and green chillies.  Then add the chopped shallots and saute it for 2 to 3 minutes until it looks translucent. Now add the ground coconut mixture, sliced raw mango and the fish.  Add very little water to this and salt as per taste.  Give it a gentle stir, without breaking the fish.  Cover the pan with a lid and cook for about 20 minutes.  Then open the lid and cook for further few minutes, until the water gets dried out completely.  In the middle of cooking give it a gentle stir.  Once the water gets dried out completely, take it off from heat and serve it with plain rice.

Sending this to Kerala Kitchen Event

reade more... Résuméabuiyad

Prawn Gravy


Suja of Kitchen Corner has some amazing collection of recipes.  Everytime when I visit her site, I used to bookmark them, especially if it's something with chicken or prawns, I would be just drooling at the pictures. This is a recipe which I have been eyeing from her site for a long time now.
Most of the time I cook in a hurry and I end up in making my usual style of curries and gravies. This time when I was buying the prawns itself I made up mind that no excuses today.  So finally I tried her prawn gravy with few variations and it was just amazing. This easy peasy gravy is surely a keeper for me.  Thank you Suja for sharing this wonderful recipe, I'll keep trying more recipes from your site. Don't forget to check her mouthwatering collections from here.


Preparation Time: 10 minutes
Cooking Time: 20-30 minutes
Serves: 3-4

Ingredients:
Prawns- 300 g (cleaned and washed)
Onion- 1 big sized sliced
Tomato- 1 small sized
Turmeric powder- 1/4 tsp
Ginger Garlic paste- 1 tsp
Chilli powder- 1 tsp
Coriander powder- 2 tsp
Fennel powder- 1/2 tsp
Cumin powder-1/2 tsp
Garam masala- 1/4 tsp
Tamarind paste-1 tsp
Lemon juice- juice of 1/2 a lemon
Curry leaves- 1 spring ( about 5 to 6 leaves)
Cinnamon stick- 1/2 inch stick
Cumin seeds-1/2 tsp
Oil- 1 tbsp
Salt as per taste

Method:
Clean and wash the prawns well.  Apply some turmeric powder and set it aside. Grind together 1/2 of onion, tomato, tamarind, lemon juice and spice powder. Heat the oil in a kadai, add cumin seeds, curry leaves and cinnamon stick.  Then add ginger garlic paste and sliced onion.  Reduce the heat to medium and cook till the onions get softened. Now add the ground masala and let it cook for 3 to 4 minutes. Finally add the prawns and salt. Mix it well to coat the gravy completely.  Cover the pan and let it cook until the prawns get cooked completely.  At this stage it would be a semi gravy, you can serve it like this or if you prefer for dry gravy, increase the heat until all the water gets absorbed and the gravy looks thick and oil oozes out from it.  Serve it hot with chapathis, plain rice or pulav.

Sending this to Joy From Fasting to Feasting


reade more... Résuméabuiyad

Goulash


Goulash is a typical Hungarian soup.  If you are a regular reader to my blog, in few of my previous posts I have mentioned that I used to think that  food without spices is bland.  This was  my opinion until I started exploring different cuisines.  Spices definitely adds a lots of flavour to the food, but the fact is each and every food say it meat or vegetable have their own flavour.  Chicken with tandoori spices is simply amazing.  But when you taste just roast chicken with a sprinkle of salt and pepper, it has it's own flavour which does taste really good.
  
 Goulash is a very simple stew, traditionally it's kept as simple as possible, with just meat, garlic and onion.  A few vegetables like carrot, leeks and celery adds much more flavour.  Don't try to add any spices and transform this simple stew into curry( I'm saying this for people like me, who tries to add spices in all different types of food).  Prepare the way , how it meant to be, you'll definitely enjoy it and see the difference.
Traditionally goulash is a slow cooked stew, cooked in a casserole for about 2 hours, off course it's hard for me to spend such long hours in cooking, so this is a simple pressure cooker method which reduces the time for cooking.

Preparation Time: 15 minutes
Cooking Time: 30 minutes
Serves 4

Ingredients:
Lamb- 400 g
Onion- 1 big sized finely chopped
Leeks- 200 g chopped
Carrot- 2 medium sized chopped
Green pepper- 1/2 chopped
Red pepper- 1/2 chopped
Parsley or coriander- 1 tbsp finely chopped
Vegetable stock- 1 1/2 cup( 1 cup= 225 ml)
Tomato puree- 2 tbsp
Paprika- 1/2 tsp
Bay leaves- 1
Cinnamon stick- 1/2 inch stick
Garlic- 4 pods finely chopped
Salt and pepper to taste
Flour- 2 tbsp+ extra
Oil- 1 tbsp

Method:
Wash the meat well, season it with salt and pepper.  Take oil in a wide open pan for browning the meat.  Dip the meat in flour and dust the excess flour.  Add 2 to 3 pieces at a time in the oil and just brown the meat, you don't have to cook it completely.  Take the meat and set aside.  To the same oil, add finely chopped garlic and onions and saute, transfer immediately to the pressure cooker in medium heat.  Add the bay leaf and cinnamon stick.
    Now add the meat, stock, paprika and pressure cook for 5 whistles.  Then add the leeks, carrot and any other vegetable if using , tomato puree and pressure cook for 2 whistles. Finally add the red pepper, salt and pepper to taste.  Then mix 2 tbsp of flour in 100 ml of water and add it slowly to the stew.  Let it simmer for further 20 minutes.Sprinkle finely chopped coriander leaves or parsley on  top of the stew and stir well.  At this stage the meat should look very tender, now you can take it off from heat.
Serve the stew warm with bread or rice.

Note:
Soup or stew taste at it's best when you use the best quality stock.

Linking this soup with Souper Sunday


reade more... Résuméabuiyad

Crispy Popcorn Chicken


I won't say this is the exact recipe from KFC or Mc donald's but something very similar to that.  Your kids are going to love you if you make them this  crispy chicken.  Probably last week sometime I made this recipe, my little one still keeps asking everyday, Ayeesha did u you made the crispy chicken today.  Yeah! my both little princess calls me as Ayeesha :-(  they never call me as amma or maama.  Anyway that's  a different story , let's come back to the recipe, this is not only something special with kids, grownups also love to munch this.  Before taking this picture I finished almost 5 pieces from the bowl.  You can serve these as a snack or as a side to accompany pizza or burger.


Also don't forget to check out my blogging buddies in the marathon Srivalli, RevaMonika, Priya Suresh, PJPriya Vaasu, JayAzeema , Soumya.and Gayathri.


Preparation Time: 20 minutes
Cooking Time: 20 minutes( approximately)
Serves: 4 Hungry kids

Ingredients:
Boneless chicken- 1/2 kg
Ginger garlic paste- 2 tsp
Chilli powder- 1/2 tsp
Garam masala- 1/2 tsp
Pepper powder- 1 tsp
Plain corn flakes- 100 g
Plain flour- to coat the chicken pieces
Lemon juice- 1/2 tbsp
Egg- 1
Turmeric powder- 1/4 tsp
Salt as required
Oil for frying

Method:
Wash the chicken well and cut them into small pieces.  Marinate the chicken with ginger garlic paste, chilli, pepper, garam masala, lemon juice and salt for 1 hour.  Crush the corn flakes using your finger tips.  Beat the egg with turmeric powder and little bit of salt.  Coat the chicken pieces in flour and dust of the excess flour.  Dip the flour coated chicken in egg and then roll them in cornflakes.  Repeat with all the chicken pieces.  Place the cornflakes coated chicken in container and keep it in the refrigerator for 1 hour.
 Heat oil in a pan, shallow fry the chicken pieces in medium to low heat until they look golden brown colour in outside.  Serve warm with ketchup.

Note:
You can also avoid frying and bake it in the oven for 15 minutes on each side at 200 degree Celsius.
reade more... Résuméabuiyad

Maqloobeh With Chicken: Non Traditional Method


Maqloobeh is a traditional Palestinian dish. This was introduced to us by one of my husband's close friend. Maqloobeh is nothing but a rice dish made with rice, meat and layers of vegetables like eggplant, potato and cauliflower . The choice of vegetables varies, but eggplant is a must for a traditional Maqloobeh. This is also called as upside down rice, since it's made in one pot and inverted in a large serving plate just before serving. The look of the dish itself makes you feel festive. A single pot dish packed with flavours and nutrients. With very mild spices, just the juices released from the meat and vegetables makes it so delicious.
 The recipe which I have given here is a bit of nontraditional method. The procedure is almost the same, but I couldn't get eggplant so it comes under the category of nontraditional method. This is a very good meal to sit and enjoy with your family.
Ingredients:
Chicken- 500 g
Rice-  500 g
Onion- 1
Tomato- 1 big one or 2 small one
Broccoli- 1 whole broccoli
Garam masala- 1/2 tsp
Paprika powder- 1/2 tsp
Turmeric powder- 1/4 tsp
Ginger garlic paste- 2 tsp
Parsley- 2 stalk
Olive oil- 3 tbsp
Salt as required
Method:
Wash the chicken well, cut it into big size pieces. Rub the chicken with spices, ginger garlic paste and salt. Heat 1 tbsp of oil in a pan, add the chicken pieces and fry them on each sides in medium heat. Then add the sliced onions and stir well. Add some water to the chicken and cook until the chicken is cooked.

Wash the broccoli, separate the florets and put them in boiling water for 5 minutes. Slice the tomatoes and set aside. Wash the rice in cold water and set aside.

Take a large heavy bottomed vessel. Keep it in slow heat, add the olive oil, arrange the slices of tomato at the bottom of the vessel. Then arrange the chicken slices. Then add a layer of rice on top of the chicken. Then add the broccoli florets. Then add the remaining rice, salt and enough water to cover the top of the rice. Keep the heat in slow, cover the vessel tightly and do not open the vessel until the rice looks fluffier. Better to use a transparent cover so that you can keep checking for the rice without opening the vessel. Once the rice looks cooked and all the water is absorbed, switch it off and allow it to rest for at least 20 minutes.
Then place a large serving plate on top of the vessel and carefully invert it.
Serve the rice by itself or with salad and stew.
A great dish to enjoy as a family.
This recipe goes to Festive Rice event hosted by Akheela of Torview.
reade more... Résuméabuiyad

Golden Onion Quiche- Sweet Punch Challenge for September 2010


This is my second challenge with Sweet Punch Team, this time our challenge is savoury by Ria of  Ria's Collections.
 We have to bake a savoury quiche with veg or non veg, as I have all meat eaters in my family I have to make only with chicken. Quiche is something which used to fear to make it , due to the tart base. I never felt comfortable with the blind baking the tart case, and I have gone wrong a few times when I tried it. This time with Ria's recipe, I found that it can be done without blind baking yet delicious and melt in the mouth pastry. Actually I haven't tasted yet, just now I made it and I'm posting it immediately since I'm a bit late with this month challenge.

The buttery pastry, tandoori chicken filling, cheese and the Italian seasoning... Oooooh! I just have to wait a few more hours until Iftar :-(
If you want to start baking with Sweet Punch click here.
Ingredients:
For the pastry:
Plain Flour- 200 g
Butter- 100 g ( frozen)
Baking Powder- 1/4 tsp
Egg- 1 beaten Lightly
Cold water- 1 or 2 tsp
For the filling:
Tandoori chicken shredded- 1/2 cup( I used 2 to 3 thighs of chicken)
Milk- 3/4 cup
Cheese- 1/2 cup( the actual recipe suggested cheddar, I couldn't get that so I have used emmentaler)
Eggs- 3 lightly beaten
Onion- medium sized sliced thinly
Red, Yellow and Green Pepper- 1/4 of each chopped
Italian seasoning- 1/4 tsp( mixture of dried herbs like dried red pepper, garlic, black pepper, oregano)
Salt and Pepper for seasoning as required
Oil- 1/2 tbsp
Method:
For The Filling:
Shred the chicken from the bone completely. Slice the onion thinly and chop the peppers. Heat the oil in a pan, add the chicken and fry for 2 minutes, since it's already cooked it dosen't need much time. Add the onions, keep the heat in medium and stir until the onion reaches golden brown, take care not to burn the onions. Finally add the chopped peppers and take it off from heat.

In a large bowl mix together the eggs, milk, cheese and seasoning. Then add the chicken mixture and mix well.
Keep it separately
For The Pastry:
Preheat the oven to 200 degree celsius. Sift the flour and baking powder in a bowl, add the grated butter, rub between your finger tips to resemble like a fine bread crumbs. Add the beaten egg and bring the dough together, if it didn't come like a dough, add a few drops of cold water and bring the dough together. Roll out the dough to fit your baking tin size, carefully lift the dough and slide it inside the tin and press the edges.

Pour the filling inside the pastry case and bake it for 25 to 30 minutes, until the filling is set and pastry looks slightly brown on sides.
Serve the quiche warm with some side salad.

reade more... Résuméabuiyad

Kethal Chicken Curry


This recipe is from Suhaina's Blog, she describes this as her one of  her favourite which she first tasted in India and an very expensive curry in Restaurant. This is almost like regular chicken curry but a bit spicy. This goes very well with rice, bread and roti's.
Ingredients:
Chicken- 1 full chicken chopped into bite size pieces
Onion- 1 big sized chopped finely
Ginger Garlic paste- 1 tbsp
Garam masala powder- 1/4 tsp
Turmeric powder- 1/2 tsp
Chilli powder- 1/2 tsp
Coriander powder- 1/2 tsp
Fennel powder- 1 1/2 tsp
Salt- as required
For Seasoning:
Oil- 1 tbsp
Crushed dried red chilli- 5
Garlic cloves- 7 finely minced
Curry leaves- 1 stalk
Method:
Wash and cut the chicken into bite size pieces. Mix it with all the ingredients and cook until the chicken is completely cooked.
In another nonstick pan, heat the oil. Add garlic, chillies and curry leaves, when it releases a nice aroma, add the cooked chicken along with the gravy. Stir well and coat all the masalas and cook until all the water evaporates and the chicken looks like semi gravy.
Serve the curry with rice or bread.
This recipe goes to Show Me Your Curry by Dil Se.
Along with this recipe I'm also sending
Green Chicken Curry
Chicken Kurma
Curry Leaves Chicken
White Lamb Kurma
Kola Urundai Kulambu to  Cooking With Seeds - Fennel Seeds by Priya's Easy N Tasty Recipes.
reade more... Résuméabuiyad