Pages

.

Showing posts with label cakes and bakes. Show all posts

Japanese Cotton Cheese Cake

Well, ladies, I'm trying to get back into blogging with something sweet and light.  This is how my mood goes when I get into blogging.  Despite of all the obstructions, I pushed myself to make something and blog about it.  Since I left quite long break for blogging, now to get back into it seems like a huge task.  Cooking arecipe, photographing it and blog about it.  Wow! That seems like a lot of work to do and on top of that I have some events which has to be organised too.  Now I can appreciate the effort of bloggers who work constantly and sincerely.


This is one of the recipes which I have been eyeing for a long time now.  I never liked the word cheesecake, somehow blogging and the amazing pictures caught my attention.  After tasting this light and soft cheesecake, I doubt if I would go back to the normal cakes.  Anyway, we enjoyed this cake a lot, to the extent that me and my kids polished it off within two hours, I'm sure you'll enjoy making this.

Recipe source: The Sweet Spot
Preparation Time: 20 minutes
Cooking Time : 1 hour 20 minutes
Makes about 8 to 9 slices

Ingredients:
Cream Cheese- 250 g
Egg yolks-6
Egg whites- 6
Plain flour- 80 gm
Baking powder- 3/4 tsp
Butter- 50 gm
Milk-100 ml
Sugar- 140 gm
Vanilla essence- 1 tsp
Grated lemon zest- 1/2 tsp

Method:
Melt together butter, cream cheese and milk in a double boiler until it reaches a liquid consistency.  Pass it through a sieve to make it lump free.  Let it cool down for a while, add the vanilla essence, lemon zest and egg yolks.  Sift the flour and baking powder into the cream mixture.  Gently give it a good mix.
Beat the egg whites separately using an electric mixture until it looks like foam.  Add the sugar little by little and beat until it reaches a glossy look.
Fold the egg white mixture into the cream cheese mixture little by little.  Preheat the oven 180 degree Celsius.  Grease and line a 8 or10 inch round cake tin.  Pour the mixture into the cake tin, place it in a water bath and bake it for about 1 hour 20 minutes.  Leave it to cool in the oven for 30 minutes.  Remove it from the oven.  Carefully remove it from the tin, slice and serve.

Note:
The oven temperature might vary for different oven, so check after 1 hour to see if it's cooked by inserting a skewer in the middle.  If the skewer comes out clean, then it's cooked.
reade more... Résuméabuiyad

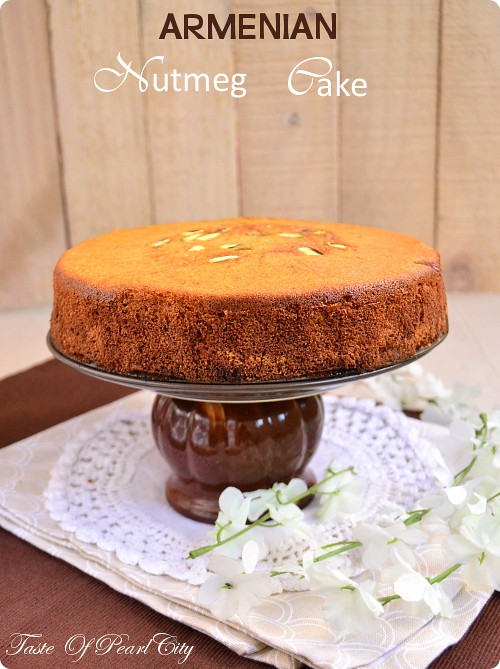
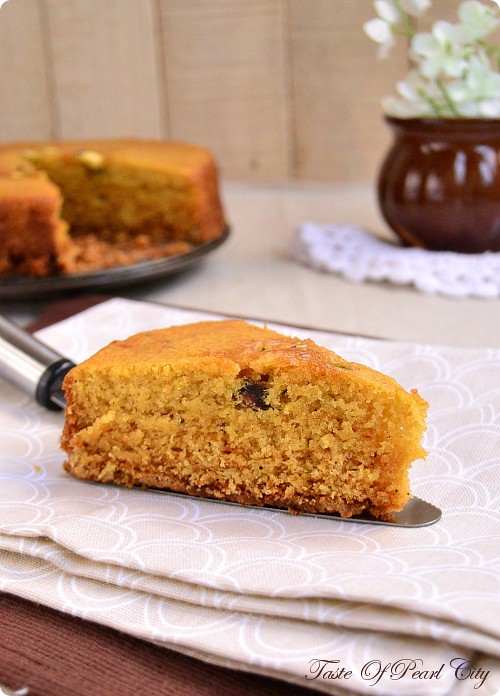
Armenian Nutmeg Cake

This month for Daring Baker's Challenge Jason from Daily Calender challenged us to make this Armenian delicacy. Actually we were given choice between two recipes. Nazook and Nutmeg were the choice given to us.  Nazook is a pastry filled with sweet filling and Nutmeg Cake is a slightly twisted version of coffee cake.  Although I wanted to make both the challenges, due to time constraints I made only the cake.
As always Daring Baker's Challenges are the best.  The cake turned out really good, it was soft, light and fluffy.  Perfect with a cup of tea.  Although I didn't make Nazook along with this challenge, will definitely try it soon.  Thank you Jason for this wonderful challenge.

Preparation Time: 10 minutes
Cooking Time: 30 minutes
Yields about 8 slices

Ingredients:
Plain flour- 280 gm
Milk- 240 ml
Butter- 170 gm
Brown sugar- 250 gm
Grated Nutmeg- 1 tsp
Pistachios- 50 gm
Egg-1
Bicarbonate of soda- 1 tsp
Baking powder- 2 tsp

Method:
Preheat the oven to 190 degree Celsius.  Grease and line a round cake tin.  Sift the flour and baking powder in a large bowl. Add the brown sugar and give it a mix.  Add the butter and rub it with your finger tips to make it like a bread crumbs.  Add half of the mixture in the cake tin and press it with your fingers. Mix together the milk and bicarbonate of soda.  Crack the egg in to the cake mixture and beat quickly, then add the milk and beat it with a electric mixture or whisk until it becomes lump free and smooth batter.  Pour the mixture in to the tin and sprinkle the pistachios on top.  Bake it in the preheated oven for 30 minutes or until a skewer inserted comes out clean.  Take it out from the oven, leave it to cool in the wire rack for about 5 minutes.  Remove the cake carefully from the tin and slice it into wedges.
reade more... Résuméabuiyad

Dulche de leche Cakes

Any one there to raise your hands to say a no to Dulce de leche.  I'm sure if you have taste it before, you wouldn't say no.  Dulce de leche makes wonders with cakes, cookies or desserts.  I wonder why Dulce de leche shouldn't be served as a dessert on it's own straight out of the can.  Whenever I make something out of Dulce de leche, I have to precautionally have an extra can than the recipe suggest, since I finish almost 1/2 of the can when I start preparing :)


This is a very simple cake which I had made so many times before with and without amazing.  Actually it taste amazing without icing.  I have seen this cake in many blogs now, anyway the first time I saw this recipe from Divya's Easy Cooking.  Probably everybody refer her site for this recipe.  Thank you Divya for this yummy yummy recipe.  You'll never worry about your calories when you have this cake.
 In the beginning of last week, I made this cake with lots of icing on top and then Daring Baker's Crunch Bread with the fried patties.  Again I felt like having this cake for the second time in the same week. Second time, to make it less sinful I have cut down two sinners from the recipe, I replaced the plain flour with whole wheat flour and icing sugar with brown sugar.  At last a few sprinkling of walnuts to make justice for the butter which I added.  Below is the image of the wholewheat version, which tasted great too with a mild variation in texture. I better have an eye on my calories after this.

Preparation Time: 15 minutes
Cooking Time: 30-40 minutes
Makes 16 squares

Ingredients:
Plain flour- 200 gm
Butter- 200 gm
Eggs- 2
Dulce de leche- 150 g
Icing Sugar- 120 g
Baking powder- 2 tsp
Bicarbonate of soda- 1/4 tsp
Vanilla essence- 1 tsp

For the Icing:
Butter- 100 g
Icing Sugar- 200 g
Dulce de leche- 75 g
Vanilla essence- 1 tsp
Chocolate sprinkles and flaked almonds- to decorate on top ( optional )

Note:
To know how to make dulche de leche please refer here.

Method:
Preheat the oven to 190 degree Celsius. Grease and line a 9 inch square cake tin.  Sift the flour, baking powder and bicarbonate of soda in a large bowl.  In separate bowl beat the butter and icing sugar with a electric beater until it looks light and fluffy.  Now add the Dulce de leche to the butter mixture and beat well.  Now add the eggs and essence and beat it again.  Finally add the flour mixture and mix it well.  Pour the batter into the prepared tin and bake it in the preheated oven for 30- 40 minutes or until a skewer inserted comes out clean.
Take it out from the oven.  Leave it to cool in the tin for about 5 minutes, then remove it out from the tin carefully and let it cool down completely.
Once cooled completely, spread the icing on top and sprinkle with chocolate sprinkles and almonds on top.

To make the icing:
The butter should be at room temperature before you start making the icing.  Beat together the butter, icing sugar, Dulce de leche and essence until it looks smooth and creamy.  Spread it on top of the cake.

For the whole wheat option:
Replace whole wheat flour for plain flour and brown sugar for icing and add some extra nuts along with the batter.  Follow the same amount and method as suggested above.


reade more... Résuméabuiyad

Coconut and Lemon Loaf for Daring Baker's February 2012

Daring Baker's was hosted by Lis for February 2012.  Lis challenged us to make quick breads,which I  have to quickly whip up in the last minute as always.  Lis has provided us with different sources to refer for quick breads with different flavours and versions.


Quick breads are made with quickly without kneading,rising and yeast.  Basically quick breads are made with rising agents like baking powder,bicarbonate of soda along with moist texture.  A quick bread can be either sweet or savoury,  you can play with different flavours to make your own version of quick bread.  A quick bread can be in the form of loaves,muffins or popovers.

I have choosed Coconut and lemon loaf for this challenge.   Coconut by itself is a fantastic flavours,  I know it goes well with cardamom.  I love the flavour of lemon and vanilla in any cakes, so today I wanted to try lemon and vanilla along with fresh grated coconut.  I felt the flavour of coconut in every bite, this is a super moist and yummy bread.  Since I made it in the last minute, I couldn't come out with some appealing pictures for this yummy loaf.  If you are a coconut lover, I'm sure you'll enjoy this a lot and will become your favourite once you try it.

Preparation Time: 10 minutes
Cooking Time: 20-25 minutes
Makes 1 mini loaf

Ingredients:
Plain flour- 100 g
Fresh grated coconut- 75 g
Butter- 75 g ( at room temperature )
Sugar- 75 g
Egg- 1
Lemon juice- Juice of 1/2 a lemon
Vanilla essence- 1 tsp
Grated lemon zest- 1/4 tsp
Baking powder- 1 tsp
Bicarbonate of soda- 1/4 tsp
Yogurt- 1/2 tbsp

Method:
Preheat the oven to 190 degree Celsius.  Grease and line a mini loaf tin.  Sift together the flour, baking powder  and bicarbonate of soda in a large bowl.  Beat together the butter and sugar in a bowl with a electric mixer.  When it looks fluffy add the egg and beat well.  Add the egg and beat again.  Now add the flour mixture, lemon juice, grated lemon zest and vanilla.  Beat all the ingredients to combine well.  Finally add the fresh grated coconut and stir.
Pour the mixture into the prepared tin and bake it in the preheated oven for 20-25 minutes or until a skewer inserted comes out clean.  Take it out from the oven, leave it cool in the tin for 5 minutes.  Gently remove from the tin,slice and serve.

Note:
The bread is too soft and moist, so take care while slicing it, so that they don't break.

Linking this recipe to Cakes,Cookies and Desserts.

reade more... Résuméabuiyad

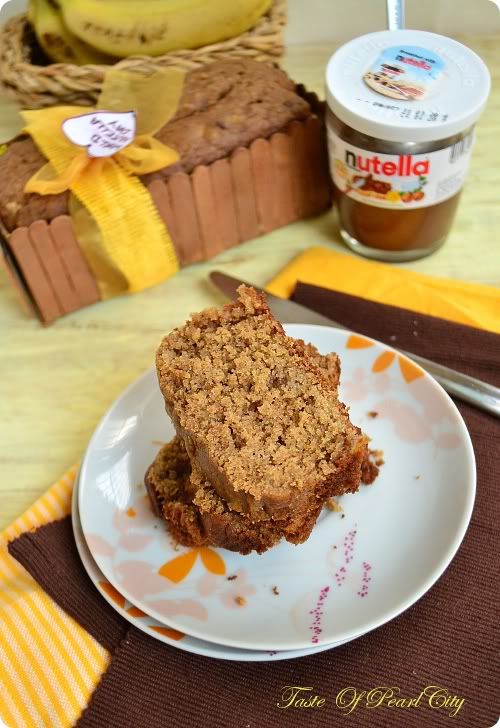
Nutella Banana Bread for World Nutella Day 2012

It's that time of the year to drool over Nutella again, actually there isn't  one day of the year to drool or eat Nutella.  Sara from Ms.Adventures in Italy and Michelle from Bleeding Espresso are the two wonderful hosts of our World Nutella Day.  This day bloggers from all over the world unite to celebrate and enjoy this yummy Nutella.  Last year I made these Nutella Cake Pops for World Nutella Day.  This year I was bit sick and feeling tired, still I didn't want to give up, so some how I managed to whip up this quick bread.


  You'll hardly need 5 minutes to prepare this cake.  This quick bread can be enjoyed as a breakfast or just as a tea time snack but today it's only for Nutella day, a big thumbs up to Nutella on this World Nutella Day.

Preparation Time: 5 minutes.
Cooking Time: 25 - 30 minutes.
Makes 2 mini loaves.

Ingredients
Whole Wheat Flour / Plain Four - 230 gm
Brown Sugar - 75 gm
Sunflower Oil - 113 ml
Milk - 60 ml
Nutella - 3 generous tbsp
Banana - 2 mashed
Eggs - 2 nos
Baking Powder - 2 tsp
Bicarbonate of Soda - 1/4 tsp
Vanilla Essence - 1 tsp
Walnuts - 10 nos (chopped)

Method
Preheat the oven to 190 degree Celsius.  Grease and line 2 mini loaf tins.
Sift the flour, baking powder, bicarbonate of soda in a large bowl.  Mix the sugar along with the flour to give a dry mixture.  Mash the banana in a separate bowl and beat in the eggs, milk, oil and vanilla essence with it to give a wet mixture.  Slowly add the wet mixture to the dry mixture.  Gently fold the mixture to just combine.  The mixture will look quite lumpy but do not over mix it as it will result in a stodgy bread.  Finally fold in the chopped nuts.  Pour the mixture into the prepared tins and bake it in the preheated oven for 25 to 30 minutes or until a skewer inserted comes out clean.  
Take it out from the oven and leave it to cool in the wire rack for 5 minutes.  Slice the breads and serve while they are still warm with honey and bananas or just on their own. 
This recipe is linked with World Nutella Day 2012.


reade more... Résuméabuiyad

Sticky Toffee Dates & Flaxseed Cake

Sticky Toffee Dates and Flaxseed Cake,quite long name,isn'it ?  Well, this is not any new recipe to you.  It's been recreated from traditional Sticky Toffee pudding.  In Sticky toffee pudding, the sauce plays the major role, warm pudding with the toffee sauce is,  Oh my!  I'm into the dream of Sticky Toffee  Pudding.

Today I was not really in a mood for something sweet, so I skipped the sauce.  The next change which I made is, since I was planning to pack this for my daughter's snack box,  I have replaced plain flour with whole wheat atta.  Finally I have added some flax seed.
In case you are new to this term flaxseed, you can read about flaxseed here, here and here.

Flax seed is rich in fibre and Omega 3, which lowers your cholesterol and keeps your heart healthy.  It also fights against diabetes and there are so many other goodness in flax seed.  Read about it in the link given above.


Preparation Time: 10 minutes
Cooking Time: 20  minutes
Makes about 6 muffins

Ingredients:
Whole Wheat Atta/ Plain flour- 160 g
Brown Sugar- 60 g
Pitted Dates- 150 g
Butter- 5 tbsp
Flax seed- 1 tbsp ( powdered )
Eggs- 2
Baking powder- 1 1/2 tsp
Bicarbonate of soda- 1/4 tsp
Vanilla essence- 1 tsp

Method:
Boil some water, add the bicarbonate of soda and pour the boiling water on top of the dates until it looks well immersed.  Cover it and let it rest for a whole night and for about 3 to 4 hours.
Beat the butter and sugar in a food processor until it looks creamy.  Add the eggs one by one and continue beating it, add the soaked dates along with water and keep beating it.  Add the sifted flour, flax seed powder, baking powder and vanilla essence, continue beating it until it looks well combined.
Preheat the oven to 190 degree Celsius.  Divide the mixture equally between greased and lined muffin tray.  I used a silicone mat, so I didn't have to line it.  Bake it in the preheated oven for 25 to 30 minutes or until a skewer inserted comes out clean.  Remove it from the oven, let it cool in the wire rack for 5 minutes and serve it warm.


Note:
If you don't have muffin tray, you can also use normal round or square pan.  Instead of whole wheat atta, you can also use plain flour.  Flax seed can also be omitted if you couldn't get them.
reade more... Résuméabuiyad

Basic Scones for Daring Baker's January 2012

It might be Basic Scones but I have to say this is the best of all scones.  This month we were challenged to make Scones by Audax from Audax Artifex.  I have never fancied scones so much but this one is a big Wow!  The reason behind this successful and fluffy scones is Audax.  Audax has explained the every single fact about this scone, which resulted in this beautiful scones.

 
There so many variations in this scones, Cream Scones, Buttermilk Scones, Fruit Scones and so many.  I highly recommend to try this Basic Scones first.  These Basic Scones are perfect when filled with some jam and clotted cream. I regret that I made a very small batch, my next try will be with wholemeal and some fresh fruits probably.   Thank you Audax for this great recipe and valuable tips, this is definitely a keeper.


Preparation Time: 10-15 minutes
Cooking Time: 10- 15 minutes
Makes 5 Scones

Ingredients:
All purpose flour- 240 g
Cold Butter- 2 tbsp
Milk- 120 ml
Baking Powder- 2 tsp
Salt a pinch

Method:
Triple sift the flour in a large bowl and mix it along with salt and baking powder.  Grate the cold butter and freeze it for about 30 minutes.  Rub the butter into the flour gently.  Add the milk and mix it into a dough using a spatula.  The dough will be quite sticky, wetter the dough lighter the scones.
Do not over work or under work the dough, both will spoil the texture.  Once the dough comes together, you can pat it gently with your fingers and cut it into scones.  If you are looking for layers, fold the dough once or twice.  Pat it gently with your fingers, dip a round cutter in a flour and cut it into rounds.
Preheat the oven to 240 degree Celsius.  Place the scones in a preheated oven for about 10 minutes, until it looks raised and lightly brown on top.  If you want a shiny top on the scones, you can glaze it with milk before baking.  Take it out from the oven, leave it to cool in a wire rack.  Serve warm scones witha dollop of Jam and fresh cream.
reade more... Résuméabuiyad

Bibingka or Rice flour Cake For Sweet Punch December 2011

Bibingka is a Filipino dessert which is baked with glutinous rice, rice flour, cheese and salted eggs.  Actually I was supposed to make this for Daring Baker's last month, which I skipped it since I couldn't find glutinous rice, next I found it quite peculiar using whole salted eggs for dessert.

We use eggs almost for most of our puddings and mousse, which is normally whipped up and get blended but this one is baked with whole salted eggs in the middle.  After skipping the process of using salted eggs and glutinous rice, I found this cake  as a very familiar taste to me, it was very much like a rice flour paniyaram which my mom used to make, except that this is been baked.  Anyways I loved this cake a lot, a best option for gluten free cake, so this recipe is my submission for Sweet Punch.  Oh! Yes, I forget to say, this month Sweet punch team has left to our choice to bake anything of our choice.  Hope you enjoy baking this cake in your home.


Preparation Time: 10 minutes
Cooking Time:  30 minutes
Makes 4

Ingredients:
Rice flour-  150 g
Eggs- 2
Sugar- 75 g
Coconut milk- 60 ml
Butter- 3 tbsp ( melted )
Baking powder- 2 tsp
Cardamom powder- 1 tsp
Fresh grated coconut- 2 tbsp

Method:
Preheat the oven to 180 degree Celsius.  Mix together rice flour, baking powder and sugar in a large bowl.  Beat in the eggs, cardamom powder and  coconut milk into the rice flour mixture.  Finally add the melted butter into the rice flour mixture.  Grease and line four ramekins.  Pour the mixture equally into the ramekins and  sprinkle the grated coconut on top of it.  Bake it in the preheated oven  for 30 to 40 minutes or until skewer inserted comes out clean.  Take it out from the oven, cool it in the wire rack for about 5 minutes.  Remove it from the ramekins and serve it while they are still warm.
Sending this to Cook, Eat Delicious Dessert- Coconut hosted by Raksha's Kitchen originally started by Raven  , Let's Cook- Baked Goodies, Cooking Concepts- Holiday Baking, A 100 Day Global Food Festival, SYF and HWS Series- Cardamom,  Jingle All The Way,  Christmas Delicacy, Sinful Delights and Bake Fest 


reade more... Résuméabuiyad

Beetroot Chocolate Brownies

Time surely flies, isn't ?  Almost each and everybody will say this, I have no time, I have done nothing, OMG! time just flies.  In the last few weeks or may be last few months I have been lagging a lot in blogging and I have a lot lot to catch up.
I couldn't keep up the schedules promptly and post recipes on time.  My apologies for having Any One Can Cook on hold for long time now.  I promise that it'll be surely on next week no matter whatever the situation.

Today I'm going to post Beetroot chocolate brownies.  This is been on my drafts for a long time now, so decided to go ahead today.  This recipe is adapted from Chef in You, I don't think anybody needs introduction about Chef in you, even if you are beginner in cooking, when you follow her recipes you'll be a great cook.  Do check out her site for all yummy recipes with easy instructions.


Preparation Time: 20 minutes
Cooking Time: 30 minutes
Makes 15 to 16 squares

Ingredients:
2 medium sized beetroots
Flour- 100 g
Butter- 100 g
Sugar- 150 g
Egg whites- 3
Cocoa powder- 3 tbsp
Dark chocolate chips- 75 g
Walnuts- 10 to 12 ( optional )
Vanilla extract- 1 tsp


Method:
Peel and wash  the beetroots.  Chop the beetroots into cubes and steam it for 10 to 15 minutes until they become soft.  Puree the cooked beetroot in a blender without adding any water.
Preheat the oven to 180 degree Celsius.  Beat together butter and sugar, until it looks creamy.  Beat it in the eggs one by one until it looks fluffy.  Add the beetroot puree and mix it to combine.  Sift together flour and cocoa powder in a large bowl.  Fold in the flour mixture into the egg mixture.  Finally fold in the chocolate chips and chopped walnuts.  Grease and line a 9 inch square cake tin.  Pour the mixture into the  prepared tin and bake it in the preheated oven for 30 to 40 minutes or until a skewer inserted comes out clean.  Take it out from the oven, leave it cool down in the tray and cut into squares.  Once cooled completely, store it in a air tight container.
reade more... Résuméabuiyad

Beetroot Halwa Tarts for Sweetpunch October 2011


This month for Sweet punch,  we have sweet little Jam tarts from  Ria's Collections.  The first thing which came to my mind was whether I'm going to use store bought jam with loads of sugar or something home made.

Initially I had the idea of making mixed fruit jam which my mom used to make, which is still with lots of sugar.  Not sure whether it'll work with brown sugar or demerara sugar.  Finally made up my mind with beetroots.  After searching through lots of recipes in net, I was afraid that  I'm not going to get jam consistency without jam sugar. 
So I made just the way how we normally make beetroot halwas and replaced white sugar with demerara sugar and of course all purpose flour with whole wheat atta .   If you are wondering why do I have to replace white sugar and all purpose flour, you can read the reasons from here and here.
  Now about the tarts, the pastry was just amazing, it had a perfect texture and the beetroot halwa worked well with it.  My kids loved this and I enjoyed baking this.  If you would like to start baking with us in Sweet punch, click here.

Preparation Time: 15 minutes
Cooking Time : 12 to 15 minutes
Makes 12 tarts

Ingredients:
Whole wheat atta / All purpose flour- 200 g
Cold butter from refrigerator- 100 g
Baking powder- 1/2 tsp
Salt- a pinch
Cold water- 4 or 5 tsp
Beetroot halwa- 12 tsp ( recipe follows )

Method:
Sift the flour, baking powder and salt in a large bowl.  Chop the butter into small pieces and rub with the flour gently until it looks like fine bread crumbs.  Add a splash of cold water and bring the dough together.  Don't add too much water or knead the dough, it'll ruin the pastry completely.

  Preheat the oven to 190 degree Celsius.  Roll the dough in the middle of two baking parchment paper.  Make small rounds using a cookie cutter.  Place the small circles in the tart tin and push it in gently on the sides.  Drop a level teaspoon of beetroot halwa inside the tart cases, if you want you can cut the remaining dough in star shapes and place it in the middle of the tart.  Bake it in the preheated oven for 12 to 15 minutes.  Leave it in the wire rack to cool, then serve immediately or store it in a air tight container.

Beetroot Halwa:
Beetroot- 2 small sized, peeled and grated finely
Demerara sugar- 75 g
Cardamom powder- 1/2 tsp
Ghee- 5 tsp

Add the grated beetroot and  1/2 cup of water in a heavy bottomed kadai and cook until all the water evaporates.  Keep stirring in the middle to avoid burning at the bottom.  Now add the sugar and keep stirring continuously, when it looks like a semi solid.  Finally add the ghee and cardamom powder, stir well until it incorporates into the halwa.  Take it off from heat.  Allow it cool down and use it for the recipe.


reade more... Résuméabuiyad

Apple Custard Muffin : Something naughty for the weekend


Are you a kind of person who like to stay long in the bed during weekend morning, so long till the clock ticks twelve and still feeling lazy to wake up.  Ok you wake up now, once you brush your teeth the next thing on your head, what's for breakfast.  Bored and tired of having a bowl of cereals, orange juice, bread with egg for your whole weekdays and rushing to work.  It's time to keep aside all your guilty feelings, diet conscious and enjoy these scrumptious muffins for this weekend.


Late Sunday morning, sitting on the side of  a large bright window with lots of sunlight but no heat hitting at you, with a cup of coffee and  a muffin on your hand is a bliss.  Alright , you don't have to go to any dreamland to enjoy these simple muffins, juts your regular breakfast table should be more than enough. If  you are still not satisfied to have these muffins for your breakfast, why not try it for your afternoon tea, which would be just perfect too.

  Anyway I tried these muffins from one of my favourite cookbook which is is been resting in my self for a quite long time now.  So it's a triple tested and trusted recipe which you can totally rely on.  Hope I have convinced you to make these muffins :)

Source: The Australian Women's Weekly
Preparation Time: 30 minutes
Cooking Time: 30- 35 minutes
Makes 6 muffin

Ingredients:
All purpose flour- 225 g
Sugar- 85 g
Butter- 45 g melted
Milk- 125 ml
Baking powder- 1 1/2 tsp
Egg- 1/2 of 1 whole egg
Bicarbonate of soda- 1/4 tsp
Thick custard- 30 ml
Apple pie filling- 2 tbsp ( recipe follows)
Brown sugar or jaggery powder- 2 tbsp
Grated nutmeg- 2 tsp
Cinnamon powder- 1/2 tsp

Method :
Sift the flour and baking powder and bicarbonate of soda in a large bowl, add sugar, 1 tsp of grated nutmeg and cinnamon powder to the flour mixture and mix it well .  Make a well  in the middle, add egg, milk and melted butter to the flour mixture, just stir to combine, do not over mix it.  The mixture should be quite lumpy. If the mixture is too thick like a dough, add a tbsp of milk to loosen the mixture.  The mixture should be similar to that of a thick batter consistency.
Preheat the oven to 180 degree Celsius.  Line the muffin tray with muffin cups.  Spoon half of the mixture equally in the 6 muffin cups. Using the back of a spoon, make a small well in the middle of the mixture, drop a teaspoon of custard and a teaspoon of apple filling in the well . Top with the remaining muffin mixture and sprinkle with brown sugar and grated nutmeg on top.  Bake it in the preheated oven for 25 to 30 minutes.  Stand in the pan for 5 minutes before turning to a wire rack. Serve warm.

Apple Pie Filling:
Ingredients:
Half of 1 apple
Juice of 1/2 a lemon
Sugar- 1/2 tbsp
Cinnamon powder- 1/4 tsp
Cornstarch- 2 tsp
Butter- 3 tsp

Method:
Peel and slice the apples thinly in small size.  Mix the apple, sugar, cinnamon powder and lemon juice in a bowl.   Let it rest in a bowl for 30 minutes.  After 30 minutes extract all the juice released from apples.  Add the extract, cornstarch and butter in a pan, let it boil.  When it starts boiling , add the apples and cover it cook till it looks thick and saucy.  Remove it from heat, let it cool down completely and use it for the recipe.

This recipe is linked with Apple Blog Hop.
reade more... Résuméabuiyad

Chocolate and Pistachio Biscotti for Sweet Punch September 2011

This time for Sweet Punch it's Italian Biscotti from Joy of Baking.  Biscotti's are a type of Italian biscuits which normally people enjoy it with their  black coffee.  I have attempted these biscotti's a few years back which was a total flop, this time  the recipe from Joy of baking is perfect.
No wonder Joy of Baking has so many fans.  The lesson which I learnt from my last time failure is whenever I try a recipe for the first time just follow the recipe as it is without changing any measurements.  Anyway we enjoyed this biscotti  a lot with our evening tea, instead of pistachios you can also add almonds, apricots or cranberries etc...


Recipe Source: Joy Of Baking
Preparation Time: 10 minutes
Cooking Time: 45 minutes

Ingredients:
All purpose flour- 225 g
Egg- 2
Sugar- 135 g
Vanilla essence- 1 tsp
Pistachios- 75 g
Dark chocolate chips- 100 g
Baking powder- 1 tsp

Method:

Preheat the oven to 180 degree Celsius.  Beat the sugar, essence and eggs with an electric beater  on high  speed until it is thick, pale and fluffy.  When you slowly raise the beater the batter will fall back slowly in small ribbons.  In a separate bowl sift the flour and baking powder.  Add the flour mixture to the egg mixture and stir to combine.  Finally fold the chocolate and pistachio into the dough.  Transfer the dough to a baking sheet lined with parchment paper.

Form the dough into a 30 cm long and 3 cm wide log.  Since the dough is quite sticky you might have to wet your hands before you shape the dough.  Bake the log in the preheated oven for 25 minutes or until the top looks firm.  Take it out from the oven and allow it to rest in a wire rack for 10 minutes.  Then slice the log with a sharp knife about 2 inch slices.  Place them in a baking sheet and bake for further 10 minutes, turning it over in the middle.  Take it out from the oven, allow it cool in a wire rack and store them in an air tight container.
reade more... Résuméabuiyad